
Is There a Leak Under the Kitchen Sink? Your Comprehensive Guide
Finding a puddle under your kitchen sink is never a welcome surprise. The question, “is there a leak under the kitchen sink?” immediately springs to mind, followed by concerns about water damage, mold, and costly repairs. This comprehensive guide is designed to help you identify, understand, and address potential leaks under your kitchen sink, providing you with the knowledge and confidence to tackle this common household problem. We’ll cover everything from identifying the source of the leak to preventative measures, ensuring you can protect your home and avoid future headaches. This isn’t just another DIY guide; it’s a deep dive into the plumbing under your sink, offering expert insights and practical solutions.
Understanding Common Causes of Leaks Under the Kitchen Sink
A leak under the kitchen sink can stem from various sources, each requiring a different approach to diagnose and repair. Understanding these common causes is the first step in resolving the issue. Ignoring the leak can lead to more significant problems, including structural damage and mold growth.
Loose Connections
Often, the culprit is simply a loose connection. Over time, vibrations, temperature changes, and general wear and tear can cause fittings to loosen, allowing water to seep through. This is one of the easiest fixes, often requiring just a wrench to tighten the connection.
Corroded or Damaged Pipes
Older homes often have pipes that are susceptible to corrosion. This can lead to pinhole leaks or even complete pipe failure. Physical damage, such as accidental bumps or impacts, can also create cracks or breaks in the pipes.
Faulty Faucets and Sprayers
The faucet itself can be the source of the leak, with worn-out O-rings, washers, or cartridges. Similarly, the sprayer hose or connection can develop leaks over time. These issues are usually relatively straightforward to repair or replace.
Drain Issues
The drain assembly, including the P-trap and drain pipes, is a common area for leaks. Clogs, corrosion, and loose connections can all contribute to drain-related leaks. The P-trap, in particular, is designed to trap debris, and if it becomes clogged, it can put pressure on the connections, leading to leaks.
Supply Line Problems
The supply lines that connect the faucet to the water supply are another potential source of leaks. These lines can become brittle over time, crack, or develop leaks at the connection points. Stainless steel braided supply lines are generally more durable than rubber ones.
Identifying the Source of the Leak: A Step-by-Step Guide
Pinpointing the exact source of the leak is crucial for effective repair. Follow these steps to systematically identify the problem area:
- Clear the Area: Remove everything from under the sink to provide a clear view of the plumbing.
- Dry the Area: Use paper towels to dry all the pipes, connections, and surfaces under the sink. This will make it easier to spot the source of the leak.
- Run the Water: Turn on the faucet and let the water run for a few minutes. Check for leaks around the faucet base, sprayer hose, and supply line connections.
- Inspect the Drain: Fill the sink with water and then drain it. Watch for leaks around the drain flange, P-trap, and drain pipes.
- Check for Corrosion: Examine the pipes and connections for signs of corrosion, such as rust or mineral buildup.
- Use a Flashlight: A flashlight can help you see into tight spaces and identify small leaks.
Tools and Materials You’ll Need for Leak Repair
Before you start any repairs, gather the necessary tools and materials. Having everything on hand will make the job much easier and prevent delays.
- Adjustable Wrench: For tightening and loosening connections.
- Pipe Wrench: For larger pipes and stubborn connections.
- Plumber’s Tape (Teflon Tape): For sealing threaded connections.
- Plumber’s Putty: For sealing drain flanges and other connections.
- Basin Wrench: For reaching hard-to-access faucet nuts.
- Screwdrivers: Both flathead and Phillips head.
- Bucket and Towels: For catching water and cleaning up spills.
- Replacement Parts: O-rings, washers, cartridges, pipes, etc.
Step-by-Step Guide to Repairing Common Kitchen Sink Leaks
Once you’ve identified the source of the leak and gathered your tools, you can begin the repair process. Here are some common leak repairs:
Tightening Loose Connections
This is often the first and easiest fix. Use an adjustable wrench to gently tighten the connection. Be careful not to overtighten, as this can damage the fitting.
Replacing O-Rings and Washers
Worn-out O-rings and washers are a common cause of faucet leaks. Turn off the water supply, disassemble the faucet, and replace the worn parts with new ones. Apply plumber’s grease to the new O-rings to ensure a good seal.
Repairing or Replacing Drain Pipes
If the drain pipes are corroded or damaged, they may need to be repaired or replaced. Use a pipe wrench to remove the old pipes and install new ones. Be sure to use plumber’s tape on the threaded connections to create a watertight seal.
Replacing Supply Lines
If the supply lines are leaking, it’s best to replace them entirely. Turn off the water supply, disconnect the old lines, and install new ones. Stainless steel braided supply lines are a good choice for their durability.
Addressing Faucet Body Leaks
Leaks originating from the faucet body often require replacing the entire faucet. While more involved, faucet replacement is a manageable DIY project with the right tools and instructions. Ensure you choose a faucet that fits your sink configuration and plumbing connections.
Preventative Measures to Avoid Future Leaks
Prevention is always better than cure. Here are some steps you can take to minimize the risk of future leaks under your kitchen sink:
- Regular Inspection: Periodically inspect the plumbing under your sink for signs of leaks or corrosion.
- Tighten Connections: Check and tighten any loose connections.
- Replace Worn Parts: Replace worn O-rings, washers, and supply lines before they fail.
- Avoid Harsh Chemicals: Avoid pouring harsh chemicals down the drain, as they can corrode pipes.
- Proper Disposal: Dispose of grease and food scraps properly to prevent clogs.
- Insulate Pipes: Insulate pipes in unheated areas to prevent freezing and bursting.
The Role of a Plumber: When to Call a Professional
While many kitchen sink leaks can be repaired DIY, some situations require the expertise of a professional plumber. Consider calling a plumber if:
- You’re uncomfortable working with plumbing.
- You can’t identify the source of the leak.
- The leak is severe or causing significant water damage.
- You suspect there may be underlying plumbing issues.
A plumber has the knowledge, experience, and tools to diagnose and repair complex plumbing problems safely and effectively. Ignoring a serious leak can lead to costly repairs and potential health hazards.
Choosing the Right Plumber: Key Considerations
Selecting a reliable and qualified plumber is crucial for ensuring a successful repair. Here are some factors to consider:
- Licensing and Insurance: Verify that the plumber is licensed and insured.
- Experience: Choose a plumber with experience in repairing kitchen sink leaks.
- Reputation: Read online reviews and ask for referrals.
- Pricing: Get estimates from multiple plumbers and compare their prices.
- Warranty: Ask about the plumber’s warranty on their work.
Understanding Kitchen Sink Plumbing Components
To effectively troubleshoot and repair leaks, it’s helpful to understand the different components of your kitchen sink plumbing:
- Faucet: The fixture that controls the flow of water.
- Supply Lines: The flexible hoses that connect the faucet to the water supply.
- Shut-Off Valves: Valves that allow you to turn off the water supply to the sink.
- Drain Flange: The fitting that connects the sink drain to the drain pipes.
- P-Trap: The U-shaped pipe that traps debris and prevents sewer gases from entering your home.
- Drain Pipes: The pipes that carry wastewater away from the sink.
Advanced Leak Detection Techniques
For persistent or hidden leaks, you may need to employ more advanced detection techniques:
- Food Coloring Test: Add a few drops of food coloring to the sink and watch for it to appear in the water under the sink.
- Pressure Test: A plumber can perform a pressure test to check for leaks in the pipes.
- Moisture Meter: A moisture meter can detect hidden moisture behind walls or under floors.
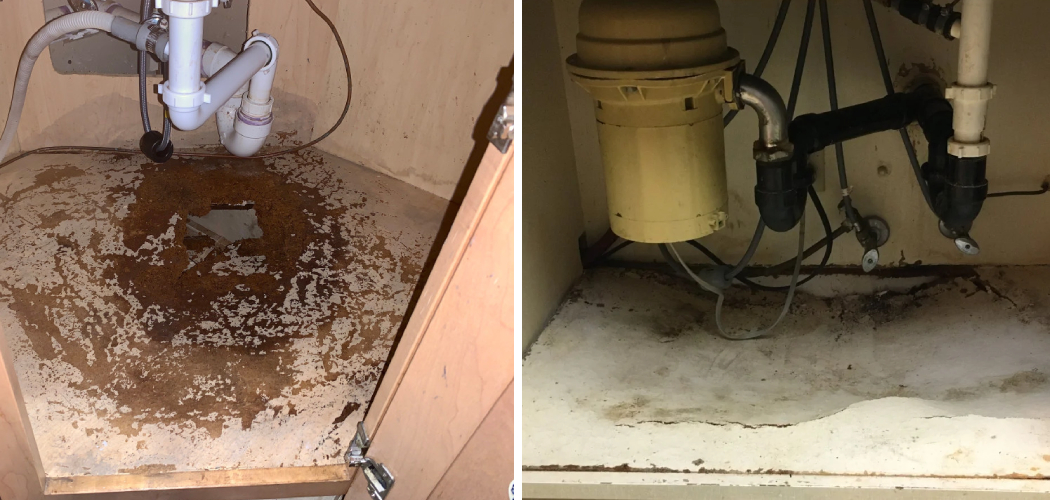
Addressing Water Damage and Mold Growth
If a leak has been ongoing for some time, it may have caused water damage or mold growth. It’s important to address these issues promptly to prevent further damage and health problems.
- Dry the Area: Thoroughly dry any wet surfaces.
- Clean and Disinfect: Clean and disinfect any affected areas.
- Remove Mold: Remove any visible mold growth.
- Professional Remediation: If the mold growth is extensive, consider hiring a professional mold remediation service.
Cost Considerations for Kitchen Sink Leak Repair
The cost of repairing a kitchen sink leak can vary depending on the severity of the leak and the extent of the damage. Simple repairs, such as tightening a loose connection or replacing an O-ring, may cost only a few dollars. More complex repairs, such as replacing pipes or the entire faucet, can cost hundreds of dollars. Hiring a plumber will also add to the cost.
Sustainable Plumbing Practices for Leak Prevention
Adopting sustainable plumbing practices can help prevent leaks and conserve water:
- Install Water-Efficient Fixtures: Choose faucets and sprayers with low-flow rates.
- Repair Leaks Promptly: Don’t delay repairing even small leaks.
- Conserve Water: Use water responsibly to reduce the strain on your plumbing system.
Expert Q&A: Addressing Common Kitchen Sink Leak Concerns
Here are some frequently asked questions about kitchen sink leaks, answered by plumbing experts:
- Q: How can I tell if a small drip is a serious problem?
A: Even small drips can lead to significant water waste and potential water damage over time. It’s best to address any leak, no matter how small, as soon as possible. - Q: What’s the best way to prevent clogs in my kitchen sink drain?
A: Avoid pouring grease down the drain, use a strainer to catch food scraps, and flush the drain with hot water regularly. - Q: Can I use DIY drain cleaners to clear a clogged drain?
A: DIY drain cleaners can be effective for minor clogs, but they can also damage pipes if used improperly. Consider using natural alternatives like baking soda and vinegar first. - Q: How often should I inspect the plumbing under my kitchen sink?
A: It’s a good idea to inspect the plumbing under your kitchen sink at least twice a year, or more frequently if you notice any signs of leaks. - Q: What type of supply lines are most durable?
A: Stainless steel braided supply lines are generally more durable than rubber ones and are less likely to crack or leak over time. - Q: Is it safe to drink water from a leaky faucet?
A: While the water itself is usually safe, a leaky faucet can indicate potential plumbing issues that could affect water quality. It’s best to repair the leak promptly. - Q: How can I protect my kitchen sink plumbing from freezing in the winter?
A: Insulate pipes in unheated areas, let the faucet drip slightly during extremely cold weather, and open cabinet doors to allow warm air to circulate around the pipes. - Q: What are the signs of a hidden leak behind my kitchen wall?
A: Signs of a hidden leak can include water stains on the wall, peeling paint, mold growth, and a musty odor. - Q: How do I know if I need to replace my entire kitchen sink faucet?
A: If the faucet is severely corroded, constantly leaking, or difficult to repair, it may be time to replace it. - Q: What’s the best way to find a reputable plumber in my area?
A: Ask for referrals from friends and family, read online reviews, and check with your local Better Business Bureau.
Conclusion: Taking Control of Kitchen Sink Leaks
Discovering a leak under your kitchen sink doesn’t have to be a stressful experience. By understanding the common causes, knowing how to identify the source, and having the right tools and knowledge, you can often resolve the issue yourself. Remember to prioritize preventative measures to minimize the risk of future leaks. When in doubt, don’t hesitate to call a professional plumber for assistance. By taking proactive steps, you can protect your home from water damage and enjoy a leak-free kitchen sink for years to come. Share your experiences with kitchen sink leaks in the comments below – your insights could help others facing similar challenges. Explore our advanced guide to preventing plumbing problems for more tips on maintaining a healthy home plumbing system.
