
How to Fix a Leaking Pipe Under Kitchen Sink: A Comprehensive Guide
Is that persistent drip, drip, drip driving you crazy? A leaking pipe under your kitchen sink is more than just an annoyance; it can lead to water damage, mold growth, and a higher water bill. Fortunately, most under-sink leaks are relatively easy to fix yourself with the right tools and knowledge. This comprehensive guide provides a step-by-step approach to diagnosing and fixing a leaking pipe under your kitchen sink, saving you money and preventing further damage. We’ll cover everything from identifying the source of the leak to choosing the right replacement parts, ensuring a successful and long-lasting repair. Our goal is to empower you with the expertise and confidence to tackle this common household problem. This isn’t just a quick fix; it’s a guide to understanding your plumbing system and preventing future issues.
Understanding the Anatomy of Your Under-Sink Plumbing
Before diving into *how to fix a leaking pipe under kitchen sink*, it’s crucial to understand the different components involved. Familiarizing yourself with these parts will make diagnosis and repair much easier.
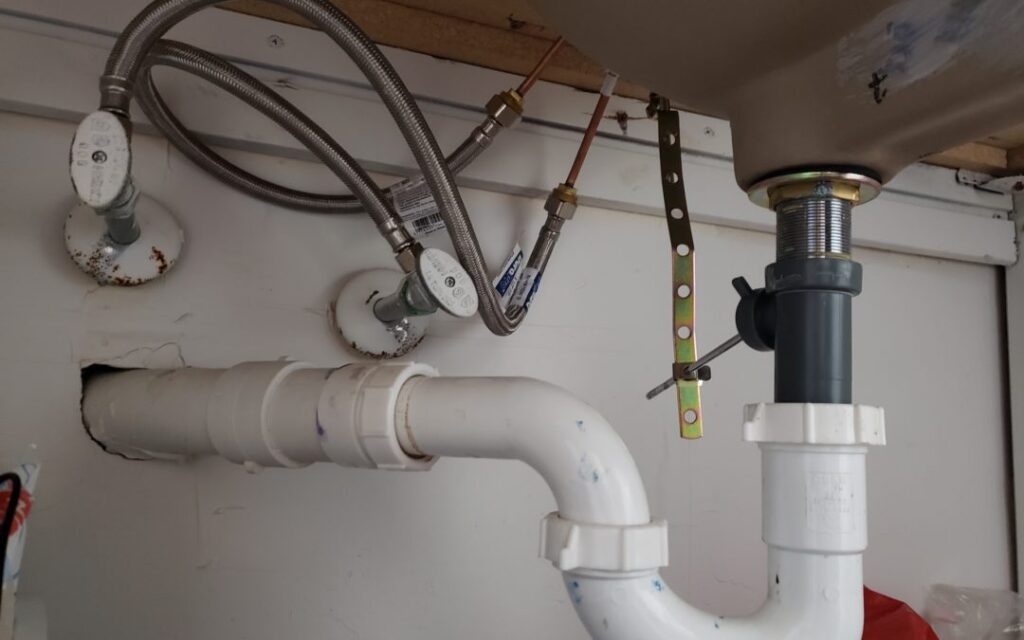
* **Supply Lines:** These flexible tubes connect your shut-off valves to the faucet. They carry hot and cold water. Leaks here are common, especially at the connection points.
* **Shut-Off Valves:** These valves control the water supply to your faucet. Knowing their location and how to use them is essential before starting any plumbing work.
* **Drain Pipes:** These pipes carry wastewater away from the sink. The drain system typically includes:
* **Sink Tailpiece:** The pipe directly below the sink drain.
* **P-Trap:** The curved pipe that traps debris and prevents sewer gases from entering your home. This is a common site for clogs and leaks.
* **Drainpipe Extension:** Connects the P-trap to the wall drain.
Understanding these components is the first step in efficiently figuring out *how to fix a leaking pipe under kitchen sink*.
Diagnosing the Source of the Leak
The first step in *how to fix a leaking pipe under kitchen sink* is accurately pinpointing the source. This requires a systematic approach:
1. **Dry Everything:** Use paper towels or a clean cloth to thoroughly dry all pipes, fittings, and connections under the sink. This makes it easier to spot the active leak.
2. **Observe Carefully:** Turn on the faucet and watch for drips or sprays. Pay close attention to connection points, such as where the supply lines connect to the faucet or shut-off valves, and where the drain pipes connect to each other.
3. **Feel for Moisture:** If you can’t see the leak, run your fingers along the pipes and connections. Moisture indicates the source.
4. **Check the P-Trap:** Carefully examine the P-trap for cracks or loose connections. This is a notorious spot for leaks due to trapped debris and corrosion.
5. **Inspect the Faucet Base:** Leaks around the base of the faucet can sometimes run down the supply lines, making it seem like the leak is coming from the pipes. Dry the area around the faucet and check again.
Once you’ve identified the source, you can determine the appropriate repair method. Accurately diagnosing the problem is half the battle when figuring out *how to fix a leaking pipe under kitchen sink*.
Tools and Materials You’ll Need
Before you start *how to fix a leaking pipe under kitchen sink*, gather the necessary tools and materials. Having everything on hand will save you time and frustration.
* **Adjustable Wrench:** For loosening and tightening nuts and fittings.
* **Channel-Lock Pliers:** Useful for gripping pipes and fittings.
* **Basin Wrench (Optional):** Helpful for reaching hard-to-access faucet nuts.
* **Screwdrivers (Phillips and Flathead):** For removing faucet components.
* **Plumber’s Tape (Teflon Tape):** For sealing threaded connections.
* **Pipe Wrench (Optional):** For removing stubborn pipes (use with caution to avoid damage).
* **Bucket:** To catch water.
* **Towels or Rags:** For cleanup.
* **Replacement Parts:** Be prepared to replace worn-out washers, O-rings, pipes, or fittings. It’s always a good idea to have a few common parts on hand.
* **Safety Glasses:** Protect your eyes from splashing water and debris.
* **Gloves:** Protect your hands.
Having these tools at the ready is crucial for a smooth experience on *how to fix a leaking pipe under kitchen sink*.
Step-by-Step Guide: How to Fix Common Leaks
Now, let’s tackle some common types of leaks and *how to fix a leaking pipe under kitchen sink*:
1. Leaking Supply Line Connection
* **Problem:** Leak at the connection between the supply line and the shut-off valve or faucet.
* **Solution:**
1. **Turn off the water:** Close the shut-off valves for both hot and cold water.
2. **Disconnect the supply line:** Use an adjustable wrench to loosen the nut connecting the supply line. Have a bucket ready to catch any remaining water.
3. **Inspect the connection:** Check the nut and the fitting for damage or corrosion. Examine the rubber washer inside the nut. If the washer is cracked or worn, replace it.
4. **Apply plumber’s tape:** Wrap Teflon tape clockwise around the threads of the fitting. This helps create a watertight seal.
5. **Reconnect the supply line:** Tighten the nut securely with the adjustable wrench, but don’t overtighten it.
6. **Turn on the water:** Slowly open the shut-off valves and check for leaks. If the leak persists, tighten the nut slightly more or replace the supply line.
2. Leaking P-Trap
* **Problem:** Leak at the P-trap connections or a crack in the P-trap itself.
* **Solution:**
1. **Place a bucket underneath:** Position a bucket under the P-trap to catch water and debris.
2. **Loosen the slip nuts:** Use channel-lock pliers or an adjustable wrench to loosen the slip nuts connecting the P-trap to the tailpiece and drainpipe extension.
3. **Remove the P-trap:** Carefully remove the P-trap, emptying its contents into the bucket. Inspect the P-trap for cracks or damage.
4. **Clean the pipes:** Clean the tailpiece and drainpipe extension with a brush or cloth to remove any debris.
5. **Inspect the slip nuts and washers:** Check the slip nuts and washers for damage. Replace them if necessary.
6. **Reassemble the P-trap:** Reconnect the P-trap, ensuring the slip nuts are properly aligned. Hand-tighten the slip nuts, then use pliers or a wrench to tighten them a quarter turn more. Avoid overtightening.
7. **Test for leaks:** Run water down the drain and check for leaks. If the leak persists, tighten the slip nuts slightly more or replace the P-trap.
3. Leaking Faucet Base
* **Problem:** Water leaking from around the base of the faucet.
* **Solution:**
1. **Turn off the water:** Close the shut-off valves.
2. **Dry the area:** Thoroughly dry the area around the faucet base.
3. **Identify the source:** Determine exactly where the water is coming from. It could be a loose faucet nut, a worn-out O-ring, or a cracked faucet base.
4. **Tighten the faucet nut:** If the faucet nut is loose, tighten it with a basin wrench (if accessible) or an adjustable wrench.
5. **Replace the O-ring:** If the leak is coming from the O-ring, you’ll need to disassemble the faucet to access it. Consult your faucet’s instruction manual or search online for specific instructions. Replace the old O-ring with a new one.
6. **Caulk the faucet base:** If the faucet base is cracked, you may need to replace the entire faucet. As a temporary fix, you can apply a bead of plumber’s caulk around the base to seal the crack. However, this is not a long-term solution.
7. **Test for leaks:** Turn on the water and check for leaks.
These are the most common scenarios when figuring out *how to fix a leaking pipe under kitchen sink*. Remember to always shut off the water supply before starting any repairs.
When to Call a Plumber
While many under-sink leaks can be fixed DIY, some situations require a professional plumber. Here are some signs it’s time to call in the experts:
* **You can’t identify the source of the leak:** If you’ve tried all the troubleshooting steps and still can’t find the leak, a plumber can use specialized tools and techniques to pinpoint the problem.
* **The pipes are severely corroded or damaged:** If the pipes are heavily corroded, rusted, or cracked, they may need to be replaced. This is best left to a professional.
* **You’re uncomfortable working with plumbing:** If you’re not confident in your DIY skills, it’s always better to call a plumber than to risk making the problem worse.
* **The leak is causing significant water damage:** If the leak has caused extensive water damage to your cabinets, flooring, or walls, you’ll need a plumber to repair the leak and a contractor to repair the damage.
* **You suspect a more serious plumbing problem:** If you suspect the leak is related to a larger plumbing issue, such as a problem with your main water line, call a plumber immediately.
Knowing when to call a plumber is just as important as knowing *how to fix a leaking pipe under kitchen sink* on your own.
Preventing Future Leaks
Prevention is always better than cure. Here are some tips to help prevent future leaks under your kitchen sink:
* **Regularly inspect your plumbing:** Check under your sink periodically for signs of leaks, such as dampness, corrosion, or dripping water.
* **Tighten loose connections:** Periodically tighten the nuts and fittings on your supply lines and drain pipes.
* **Avoid pouring grease down the drain:** Grease can solidify in the pipes and cause clogs, which can lead to leaks.
* **Flush the drain regularly:** Flush the drain with hot water and baking soda or vinegar to help prevent clogs.
* **Replace worn-out parts:** Replace worn-out washers, O-rings, and pipes before they start to leak.
* **Consider a leak detector:** Install a water leak detector under your sink to alert you to leaks early on.
Taking these preventative measures will save you time, money, and headaches in the long run. Prevention is key when it comes to *how to fix a leaking pipe under kitchen sink* from happening in the first place.
The Role of Plumber’s Putty and Teflon Tape
Two important materials in plumbing are plumber’s putty and Teflon tape. Understanding their uses is crucial when learning *how to fix a leaking pipe under kitchen sink*.
* **Plumber’s Putty:** This pliable clay-like substance is used to create a watertight seal around drains and faucets. It’s applied to the underside of the fixture before it’s installed, preventing water from seeping through. It’s not used for pressurized connections.
* **Teflon Tape (Plumber’s Tape):** This thin, white tape is used to seal threaded pipe connections. It’s wrapped around the threads of the male fitting before it’s connected to the female fitting. The tape fills in any gaps between the threads, creating a watertight seal. It’s essential for preventing leaks in threaded connections.
Using these materials correctly can significantly improve the success of your plumbing repairs.
Advanced Techniques for Stubborn Leaks
Sometimes, a simple tightening or washer replacement isn’t enough. Here are some advanced techniques for dealing with stubborn leaks:
* **Using a Pipe Wrench:** For extremely stubborn pipes, a pipe wrench can provide extra leverage. However, use it with caution, as it can easily damage the pipes. Wrap the pipe with a cloth to protect it from the wrench’s teeth.
* **Applying Heat:** Gently heating a stubborn fitting with a heat gun can help loosen it. Be careful not to overheat the fitting, as this can damage the pipe.
* **Using Penetrating Oil:** Applying penetrating oil to a corroded fitting can help loosen it. Let the oil soak in for several hours before attempting to loosen the fitting.
* **Cutting and Replacing Sections of Pipe:** If a section of pipe is severely damaged, you may need to cut it out and replace it with a new section. This requires specialized tools and skills.
These techniques should be used as a last resort and only if you’re comfortable with more advanced plumbing repairs. Safety first when figuring out *how to fix a leaking pipe under kitchen sink*.
The Importance of Water Conservation
Fixing a leaking pipe isn’t just about saving money; it’s also about conserving water. Even a small leak can waste a significant amount of water over time. By promptly repairing leaks, you’re doing your part to protect this precious resource. Consider installing low-flow faucets and showerheads to further reduce your water consumption. Every drop counts when considering *how to fix a leaking pipe under kitchen sink* and its broader environmental impact.
Q&A: Expert Answers to Common Leak Questions
Here are some frequently asked questions related to fixing leaks under the kitchen sink:
1. **Q: How do I know if I have a slow leak under my sink?**
**A:** Look for signs of dampness, mold, or water stains in the cabinet under your sink. You may also notice a musty odor. Check your water meter for unusual increases in usage.
2. **Q: What’s the best way to clean up mold caused by a leak?**
**A:** For small areas of mold, you can use a solution of bleach and water (1 part bleach to 10 parts water). Wear gloves and a mask, and ventilate the area well. For large areas of mold, it’s best to call a professional mold remediation service.
3. **Q: Can I use duct tape to fix a leaking pipe temporarily?**
**A:** Duct tape is not a reliable solution for fixing a leaking pipe. It may provide a temporary fix, but it’s likely to fail. It’s always best to repair the leak properly with the correct materials.
4. **Q: How often should I inspect my under-sink plumbing?**
**A:** You should inspect your under-sink plumbing at least once a month. This will allow you to catch leaks early and prevent them from causing significant damage.
5. **Q: What type of pipe is best for replacing my kitchen sink drain?**
**A:** PVC or ABS plastic pipes are commonly used for kitchen sink drains. They are durable, affordable, and easy to work with.
6. **Q: My shut-off valve is stuck. What should I do?**
**A:** Try gently tapping the valve with a hammer to loosen it. You can also try applying penetrating oil. If the valve is still stuck, it may need to be replaced. Call a plumber if you’re not comfortable replacing it yourself.
7. **Q: How do I prevent my P-trap from clogging?**
**A:** Avoid pouring grease down the drain. Flush the drain regularly with hot water and baking soda or vinegar. You can also install a strainer in the sink to catch food particles.
8. **Q: What’s the difference between a slip nut and a compression fitting?**
**A:** A slip nut is used to connect drain pipes. It has a smooth surface and relies on a washer to create a seal. A compression fitting is used to connect supply lines. It has a tapered fitting that compresses against the pipe to create a seal.
9. **Q: Can I reuse old plumbing parts?**
**A:** It’s generally not recommended to reuse old plumbing parts, especially washers and O-rings. They may be worn out and prone to leaking.
10. **Q: How can I find a reputable plumber in my area?**
**A:** Ask for recommendations from friends, family, or neighbors. Check online reviews and ratings. Make sure the plumber is licensed and insured.
Conclusion: Taking Control of Your Kitchen Plumbing
Knowing *how to fix a leaking pipe under kitchen sink* empowers you to tackle a common household problem efficiently and confidently. By understanding the components of your plumbing system, diagnosing the source of the leak, and following the step-by-step instructions in this guide, you can save money, prevent water damage, and conserve water. Remember to prioritize safety and call a plumber when needed. With a little knowledge and the right tools, you can keep your kitchen plumbing in top shape. Share your experiences with fixing leaks under your sink in the comments below! Explore our advanced guide to preventing drain clogs for more helpful tips.
