
Do I Need to Repair Both Delta Faucets if Leaking at the Base? A Comprehensive Guide
Are you facing the frustrating issue of a leaky Delta faucet? If you have a double faucet setup, a common question arises: do I need to repair both Delta faucets if leaking at the base? The simple answer isn’t always straightforward. While it might seem logical to only fix the problematic faucet, several factors come into play. This comprehensive guide will delve into the complexities of faucet repair, exploring when a single repair suffices and when addressing both faucets is the wiser, more cost-effective, and ultimately, the more reliable solution. We’ll provide expert insights, practical advice, and actionable steps to help you make the best decision for your plumbing and your wallet. We aim to make this as informative and comprehensive as possible to ensure you understand the nuances of Delta faucet repair. Let’s dive in and determine whether you need to repair both Delta faucets if leaking at the base.
Understanding Delta Faucet Leaks at the Base
A leak at the base of a Delta faucet can indicate several underlying problems. It’s crucial to accurately diagnose the cause before deciding on the repair strategy. Ignoring the root cause can lead to recurring issues and potentially more significant water damage. Understanding the different components of a Delta faucet and how they interact is fundamental to effective troubleshooting. Delta faucets, known for their durability and design, still succumb to wear and tear over time.
Common Causes of Base Leaks
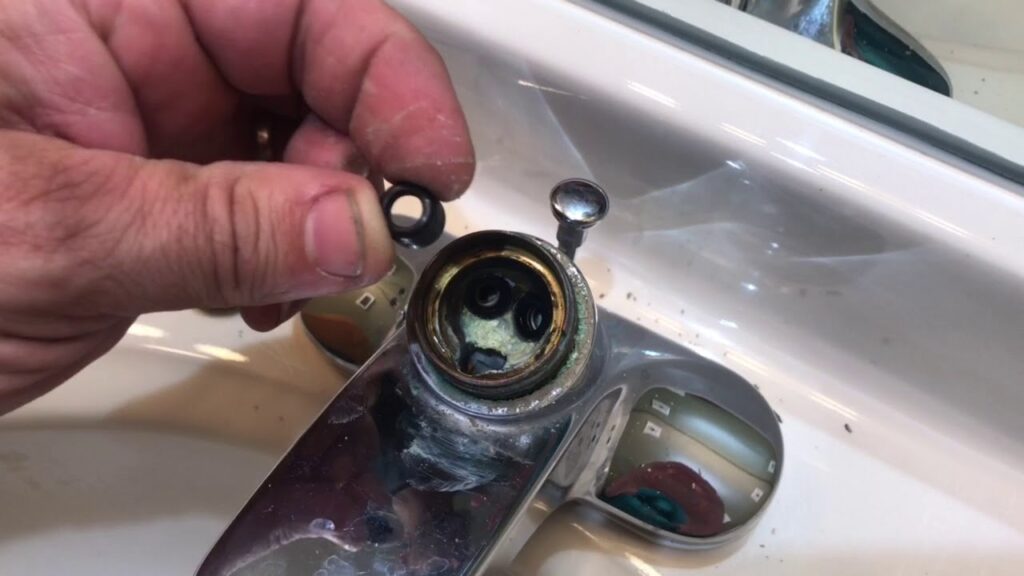
* **O-Ring Degradation:** The O-rings, small rubber seals, prevent water from escaping around the faucet base. Over time, these rings can dry out, crack, or become brittle, leading to leaks. This is a very common issue, especially in older faucets.
* **Cartridge Issues:** Delta faucets use cartridges to control water flow and temperature. A damaged or worn-out cartridge can cause leaks, often manifesting at the base of the faucet. Mineral buildup can also negatively impact cartridge performance.
* **Loose Connections:** The connections between the faucet body and the water supply lines can loosen over time due to vibrations or temperature fluctuations. This is an easy fix that often gets overlooked.
* **Corroded Faucet Body:** In rare cases, the faucet body itself can corrode, especially in areas with hard water. This is a more serious issue that might necessitate a full faucet replacement.
* **Inlet Supply Line Issues:** Sometimes, the leak might not be the faucet itself. Check the inlet supply lines connected to the faucet under the sink. These lines can corrode or loosen at their connection points, causing water to drip down and appear as if it’s coming from the faucet base.
The Importance of Proper Diagnosis
A thorough inspection is paramount. Before deciding whether to repair one or both faucets, carefully examine the leaking faucet to pinpoint the source of the leak. Use a flashlight and mirror to get a better view of hard-to-reach areas. Check for mineral buildup, cracks, or any signs of wear and tear. Once you’ve identified the root cause, you can make an informed decision about the best course of action. Furthermore, take photos or videos of the leaky area before disassembly; this can be invaluable during reassembly. This meticulous approach will save time and prevent unnecessary repairs.
Why Consider Repairing Both Delta Faucets?
While it might seem counterintuitive to repair a faucet that isn’t currently leaking, there are compelling reasons to consider addressing both faucets simultaneously, especially if they are part of a matching set. Think of it like changing the tires on your car; you generally replace them in pairs to ensure even wear and optimal performance. The same principle often applies to faucets.
Matching Wear and Tear
If one faucet is leaking due to worn-out parts, it’s highly likely that the other faucet is experiencing similar wear and tear. Replacing the components in both faucets at the same time ensures they have a similar lifespan and reduces the likelihood of future leaks in the near future. This proactive approach can save you time, money, and hassle in the long run. Consider the age of both faucets; if they were installed at the same time, they’ve likely endured the same water conditions and usage patterns.
Preventing Future Inconvenience
Imagine repairing one faucet only to have the other one start leaking a few weeks or months later. This scenario is common, especially with older faucets. Repairing both faucets preemptively avoids the inconvenience of repeated repairs and potential water damage. It’s also more efficient to purchase parts and tools once rather than making multiple trips to the hardware store.
Maintaining Aesthetic Consistency
If your faucets are part of a matching set, repairing only one might result in subtle differences in appearance over time. Replacement parts might have a slightly different finish or design than the original components. Repairing both faucets ensures a consistent look and feel, preserving the aesthetic appeal of your bathroom or kitchen. This is particularly relevant if you have a high-end faucet set.
Cost-Effectiveness in the Long Run
While repairing both faucets might seem more expensive upfront, it can be more cost-effective in the long run. You’ll save on labor costs if you hire a plumber, as they can complete both repairs in a single visit. You’ll also avoid the cost of future repairs and potential water damage. Furthermore, some retailers offer discounts on bulk purchases of faucet repair parts. Consider the overall cost of ownership, including potential repairs and water bills, when making your decision.
When is it Okay to Repair Only One Delta Faucet?
Despite the advantages of repairing both faucets, there are situations where repairing only the leaking faucet is the more practical choice. These scenarios typically involve newer faucets, easily replaceable parts, or budget constraints.
Newer Faucets with Readily Available Parts
If your faucets are relatively new and the leaking faucet has a readily available replacement part, such as an O-ring or cartridge, repairing only the affected faucet might be sufficient. This is especially true if the other faucet is functioning perfectly and shows no signs of wear and tear. However, it’s still wise to inspect the other faucet for potential issues.
Simple and Inexpensive Repairs
If the leak is caused by a minor issue, such as a loose connection or a easily replaceable O-ring, repairing only the leaking faucet is a reasonable option. These types of repairs are typically quick, inexpensive, and don’t require specialized tools. However, be sure to address the underlying cause of the issue to prevent it from recurring.
Budget Constraints
In some cases, budget constraints might make it difficult to repair both faucets simultaneously. If this is the case, prioritize repairing the leaking faucet to prevent further water damage and address the other faucet when funds become available. Consider purchasing the necessary parts for the second faucet and storing them until you can complete the repair.
Different Usage Patterns
If one faucet is used significantly more than the other, it might make sense to only repair the one that’s showing signs of wear. For example, in a master bathroom, the primary sink might be used much more frequently than the secondary sink. In this case, the primary sink faucet is more likely to experience wear and tear.
Step-by-Step Guide to Repairing a Leaking Delta Faucet at the Base
Whether you decide to repair one or both faucets, it’s essential to follow a systematic approach to ensure a successful repair. Here’s a step-by-step guide to help you through the process:
1. Gather Your Tools and Materials
Before you begin, gather all the necessary tools and materials. This will save you time and prevent frustration. You’ll typically need:
* Adjustable wrench
* Screwdrivers (Phillips and flathead)
* Pliers
* O-ring assortment
* Cartridge puller (if replacing the cartridge)
* Penetrating oil
* Clean cloths or towels
* New Delta faucet cartridge (if needed)
* Plumber’s grease
2. Shut Off the Water Supply
Locate the shut-off valves under the sink and turn them clockwise to stop the water supply to the faucet. If you don’t have individual shut-off valves, you’ll need to turn off the main water supply to your home. This is a crucial step to prevent flooding and water damage.
3. Disassemble the Faucet
Carefully disassemble the faucet, following the manufacturer’s instructions. Typically, you’ll need to remove the handle, spout, and any decorative trim to access the cartridge or O-rings. Take photos or videos as you disassemble the faucet to help you remember how to reassemble it later.
4. Identify and Replace the Worn Parts
Once you’ve disassembled the faucet, inspect the O-rings, cartridge, and other components for signs of wear and tear. Replace any worn or damaged parts with new ones. Apply plumber’s grease to the O-rings before installing them to ensure a proper seal. If you’re replacing the cartridge, use a cartridge puller to remove the old cartridge without damaging the faucet body.
5. Reassemble the Faucet
Carefully reassemble the faucet, following the reverse order of disassembly. Ensure that all connections are tight but not overtightened. Overtightening can damage the faucet or cause leaks.
6. Test for Leaks
Turn the water supply back on slowly and check for leaks around the base of the faucet, the spout, and the connections to the water supply lines. If you find any leaks, tighten the connections or replace any faulty parts.
Choosing the Right Delta Faucet Repair Parts
Selecting the correct replacement parts is crucial for a successful faucet repair. Using generic or incompatible parts can lead to leaks, poor performance, and even damage to the faucet. Always use genuine Delta faucet repair parts to ensure a proper fit and reliable operation.
Identifying the Correct Part Number
Delta faucets typically have a model number stamped on the faucet body or handle. Use this model number to identify the correct replacement parts on the Delta website or at your local hardware store. You can also contact Delta customer service for assistance in identifying the correct part number.
Purchasing Genuine Delta Parts
Purchase genuine Delta faucet repair parts from authorized retailers or directly from the Delta website. Avoid purchasing counterfeit or aftermarket parts, as they may not meet Delta’s quality standards. Genuine Delta parts are typically backed by a warranty, providing added peace of mind.
Considering a Faucet Upgrade
If your faucets are old or outdated, consider upgrading to a newer model instead of repairing them. Newer faucets often have improved features, such as water-saving technology and more durable construction. Upgrading your faucets can also enhance the aesthetic appeal of your bathroom or kitchen.
Expert Tips for Preventing Future Faucet Leaks
Preventing future faucet leaks is always better than having to repair them. Here are some expert tips to help you keep your Delta faucets in top condition:
* **Regularly Inspect Your Faucets:** Check your faucets for leaks or signs of wear and tear at least twice a year. Early detection can prevent minor issues from becoming major problems.
* **Clean Your Faucets Regularly:** Mineral buildup can damage faucet components and cause leaks. Clean your faucets regularly with a mild soap and water solution to remove mineral deposits.
* **Lubricate Moving Parts:** Apply plumber’s grease to the O-rings and other moving parts of your faucets to keep them lubricated and prevent them from drying out.
* **Avoid Overtightening Connections:** Overtightening connections can damage faucet components and cause leaks. Tighten connections only until they are snug.
* **Install a Water Softener:** If you have hard water, consider installing a water softener to reduce mineral buildup in your faucets and other plumbing fixtures.
Delta Faucet Repair: DIY vs. Hiring a Plumber
Deciding whether to repair your Delta faucet yourself or hire a plumber depends on your skill level, the complexity of the repair, and your comfort level with plumbing tasks. Simple repairs, such as replacing an O-ring or tightening a loose connection, can often be handled by DIYers. However, more complex repairs, such as replacing a cartridge or dealing with corroded pipes, might require the expertise of a licensed plumber.
DIY Repair Considerations
* **Skill Level:** Assess your plumbing skills and experience before attempting a DIY repair. If you’re not comfortable working with plumbing, it’s best to hire a plumber.
* **Complexity of the Repair:** Consider the complexity of the repair. Simple repairs are typically within the capabilities of most DIYers, while more complex repairs require specialized tools and knowledge.
* **Time Commitment:** DIY repairs can take time, especially if you’re not familiar with the process. Be prepared to spend several hours on the repair.
* **Potential for Mistakes:** DIY repairs can lead to mistakes, which can result in further damage or leaks. Be sure to follow the manufacturer’s instructions carefully and take your time.
Hiring a Plumber Considerations
* **Expertise and Experience:** Plumbers have the expertise and experience to diagnose and repair faucet issues quickly and efficiently.
* **Specialized Tools:** Plumbers have access to specialized tools that are necessary for certain types of repairs.
* **Warranty:** Plumbers typically offer a warranty on their work, providing added peace of mind.
* **Cost:** Hiring a plumber can be more expensive than DIY repair, but it can save you time, hassle, and potential mistakes.
Do I Need to Repair Both Delta Faucets if Leaking at the Base? – Q&A
Here are some frequently asked questions related to repairing Delta faucets:
**Q1: How do I identify the model number of my Delta faucet?**
A1: The model number is usually stamped on the faucet body, handle, or under the sink on the supply lines. You can also find it in the original installation instructions or on the Delta website by searching for your faucet’s style.
**Q2: What is the most common cause of a Delta faucet leaking at the base?**
A2: The most common cause is a worn-out O-ring or cartridge. These parts degrade over time due to water exposure and mineral buildup.
**Q3: Can I use generic parts to repair my Delta faucet?**
A3: While generic parts might fit, it’s always recommended to use genuine Delta parts to ensure proper fit, performance, and longevity.
**Q4: How often should I replace the cartridge in my Delta faucet?**
A4: The lifespan of a cartridge depends on water quality and usage. However, it’s generally recommended to replace the cartridge every 5-7 years or when you notice leaks or reduced water flow.
**Q5: What is plumber’s grease, and why should I use it?**
A5: Plumber’s grease is a waterproof lubricant that helps seal O-rings and prevent them from drying out and cracking. It also makes it easier to install and remove faucet components.
**Q6: How do I remove a stuck Delta faucet handle?**
A6: Apply penetrating oil to the base of the handle and let it sit for a few minutes. Then, gently rock the handle back and forth while pulling upwards. Avoid using excessive force, as this can damage the handle or faucet body.
**Q7: What should I do if I can’t find the replacement parts for my Delta faucet?**
A7: Contact Delta customer service for assistance. They can help you identify the correct parts and locate a retailer that carries them. You might also consider upgrading to a newer faucet model if parts are unavailable.
**Q8: Is it necessary to turn off the water supply before repairing a Delta faucet?**
A8: Yes, it’s essential to turn off the water supply to prevent flooding and water damage. Locate the shut-off valves under the sink or turn off the main water supply to your home.
**Q9: How do I clean mineral buildup from my Delta faucet?**
A9: Soak a cloth in white vinegar and wrap it around the affected area. Let it sit for a few hours or overnight, then scrub away the mineral deposits with a soft brush.
**Q10: What are the signs that my Delta faucet needs to be replaced instead of repaired?**
A10: If the faucet body is corroded, the parts are unavailable, or the repairs are becoming frequent and costly, it might be time to replace the faucet.
Conclusion: Making the Right Decision for Your Delta Faucets
Deciding whether to repair both Delta faucets when one is leaking at the base requires careful consideration of several factors. While repairing only the leaking faucet might seem like the most economical choice in the short term, addressing both faucets can often be more cost-effective and convenient in the long run. By understanding the common causes of faucet leaks, evaluating the condition of your faucets, and following the expert tips outlined in this guide, you can make an informed decision that protects your plumbing and your wallet. Remember, proactive maintenance and timely repairs are key to keeping your Delta faucets functioning smoothly for years to come. If you’re still unsure about the best course of action, don’t hesitate to consult with a qualified plumber. Share your experiences with Delta faucet repairs in the comments below, or explore our other guides for more plumbing tips and advice. Contact our experts for a consultation on complex Delta faucet repairs and ensure your plumbing is in top shape.
