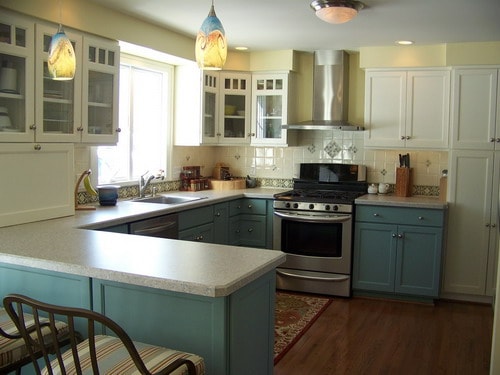
## Adding a Peninsula with Lowe’s Cabinets: Your Comprehensive Guide
Transforming your kitchen into a more functional and stylish space often involves creative solutions like adding a peninsula. If you’re considering adding a peninsula with Lowe’s cabinets, you’ve come to the right place. This comprehensive guide will walk you through every step of the process, from planning and design to installation and finishing touches. We’ll explore the advantages of using Lowe’s cabinets, delve into design considerations, provide expert installation tips, and answer frequently asked questions to ensure a successful and satisfying kitchen renovation. This isn’t just a how-to; it’s a complete resource designed to provide you with the knowledge and confidence to create the kitchen of your dreams.
### Why Choose Lowe’s Cabinets for Your Kitchen Peninsula?
Lowe’s offers a wide variety of kitchen cabinets, catering to different styles, budgets, and functional needs. Their readily available stock and custom options make them a popular choice for homeowners undertaking kitchen renovations. Here’s why you might consider Lowe’s cabinets when adding a peninsula:
* **Variety of Styles and Finishes:** Lowe’s offers a diverse range of cabinet styles, from traditional to modern, and a wide selection of finishes, allowing you to match your existing kitchen décor or create a completely new look.
* **Budget-Friendly Options:** Lowe’s provides cabinets at various price points, making it possible to find quality options that fit your budget. They frequently offer sales and promotions, further enhancing affordability.
* **Convenience and Accessibility:** With numerous locations nationwide, Lowe’s offers convenient access to cabinets and expert advice. You can easily browse their selection online or visit a store to see the cabinets in person.
* **Project Support:** Lowe’s provides project support services, including kitchen design assistance, installation services, and financing options, making the renovation process smoother and less daunting.
* **Warranty and Customer Support:** Lowe’s cabinets typically come with a warranty, providing peace of mind and protection against defects. Their customer support team can assist with any questions or concerns you may have.
## 1. Planning Your Peninsula Project with Lowe’s Cabinets
Before you even set foot in a Lowe’s store, thorough planning is crucial. This involves assessing your space, defining your needs, and creating a design that maximizes functionality and aesthetics. Careful planning will save you time, money, and frustration in the long run.
### 1.1. Assessing Your Kitchen Space
Start by measuring your kitchen accurately. Consider the following:
* **Available Space:** Determine the dimensions of the area where you plan to add the peninsula. Ensure there’s enough clearance for comfortable movement around the peninsula and other kitchen elements.
* **Traffic Flow:** Analyze the existing traffic flow in your kitchen. The peninsula should enhance, not hinder, movement. Consider how people typically move through the space and position the peninsula accordingly.
* **Existing Features:** Note the location of existing appliances, plumbing, electrical outlets, and windows. These factors will influence the design and placement of your peninsula.
* **Structural Considerations:** Check for any structural limitations, such as load-bearing walls or pipes, that might affect the feasibility of your project.
### 1.2. Defining Your Needs and Goals
What do you hope to achieve by adding a peninsula? Consider these questions:
* **Increased Counter Space:** Do you need more surface area for food preparation?
* **Additional Storage:** Are you looking for extra cabinet space to store kitchen essentials?
* **Breakfast Bar or Seating Area:** Do you want to create a casual dining area?
* **Room Division:** Do you want to visually separate the kitchen from an adjacent living area?
* **Improved Kitchen Layout:** Are you aiming to create a more functional and efficient kitchen layout?
Once you’ve defined your needs, prioritize them. This will help you make informed decisions about the size, shape, and features of your peninsula.
### 1.3. Designing Your Peninsula Layout with Lowe’s Cabinets
With your measurements and needs in hand, it’s time to design your peninsula layout. Consider these design elements:
* **Shape and Size:** Choose a shape and size that complements your kitchen’s overall design and meets your functional needs. Common shapes include rectangular, L-shaped, and curved peninsulas. The size should be proportional to the available space and the surrounding elements.
* **Cabinet Configuration:** Determine the number and type of cabinets you’ll need. Consider base cabinets, drawers, corner cabinets, and specialty cabinets. Lowe’s offers a variety of cabinet configurations to suit different needs.
* **Countertop Material:** Select a countertop material that complements your cabinets and provides a durable and attractive surface. Lowe’s offers a wide range of countertop options, including laminate, granite, quartz, and butcher block.
* **Seating Arrangement:** If you plan to use the peninsula as a breakfast bar or seating area, determine the number of seats you’ll need and the type of seating you prefer. Consider bar stools, chairs, or a combination of both.
* **Electrical Outlets:** Incorporate electrical outlets into your peninsula design to provide power for appliances, lighting, and other devices. Ensure the outlets comply with local electrical codes.
* **Lighting:** Plan for adequate lighting to illuminate the peninsula and surrounding area. Consider pendant lights, recessed lights, or under-cabinet lighting.
### 1.4. Budgeting for Your Peninsula Project
Establish a realistic budget for your peninsula project. Consider the following costs:
* **Cabinets:** The cost of the cabinets will be the most significant expense. Get quotes from Lowe’s for the cabinets you’ve selected.
* **Countertops:** The cost of the countertops will vary depending on the material you choose.
* **Hardware:** Factor in the cost of cabinet hardware, such as knobs, pulls, and hinges.
* **Plumbing and Electrical:** If you need to relocate plumbing or electrical outlets, factor in the cost of hiring a licensed plumber or electrician.
* **Installation:** If you’re not installing the peninsula yourself, factor in the cost of professional installation.
* **Permits:** Check with your local building department to see if you need any permits for your project. Factor in the cost of obtaining the necessary permits.
* **Miscellaneous Expenses:** Set aside a contingency fund for unexpected expenses.
## 2. Selecting the Right Lowe’s Cabinets for Your Peninsula
Once you have a solid plan, it’s time to visit Lowe’s and select the cabinets for your peninsula. With so many options available, it’s essential to consider your style preferences, budget, and functional needs. Lowe’s provides a user-friendly experience both online and in-store to aid in the selection process.
### 2.1. Exploring Cabinet Styles and Finishes at Lowe’s
Lowe’s offers a diverse range of cabinet styles to suit different tastes. Here are some popular options:
* **Shaker Cabinets:** Shaker cabinets are characterized by their simple, clean lines and recessed panel doors. They are a versatile choice that complements both traditional and modern kitchens.
* **Flat-Panel Cabinets:** Flat-panel cabinets feature sleek, minimalist designs with smooth, unadorned doors. They are a popular choice for contemporary kitchens.
* **Raised-Panel Cabinets:** Raised-panel cabinets have doors with a raised center panel, adding a touch of elegance and sophistication to your kitchen.
* **Glass-Front Cabinets:** Glass-front cabinets feature glass doors that allow you to display your dishes and glassware. They can add visual interest and a sense of openness to your kitchen.
Lowe’s also offers a wide selection of cabinet finishes, including:
* **Painted Finishes:** Painted cabinets come in a variety of colors, allowing you to customize your kitchen to your exact specifications.
* **Stained Finishes:** Stained cabinets showcase the natural beauty of the wood grain. They are a classic choice that complements a variety of kitchen styles.
* **Laminate Finishes:** Laminate cabinets are a budget-friendly option that offers durability and easy maintenance.
### 2.2. Considering Cabinet Materials and Construction
Lowe’s cabinets are typically constructed from a variety of materials, including:
* **Solid Wood:** Solid wood cabinets are the most durable and expensive option. They offer a timeless look and can be refinished if needed.
* **Plywood:** Plywood cabinets are a durable and cost-effective alternative to solid wood. They are less prone to warping and cracking than solid wood.
* **Particleboard:** Particleboard cabinets are the most affordable option. They are less durable than solid wood or plywood and are more susceptible to water damage.
Consider the construction of the cabinet boxes, doors, and drawers. Look for cabinets with solid construction, sturdy hinges, and smooth-gliding drawers.
### 2.3. Evaluating Cabinet Features and Functionality
Lowe’s offers a variety of cabinet features to enhance functionality and convenience. Consider the following:
* **Soft-Close Hinges and Drawers:** Soft-close hinges and drawers prevent slamming and provide a smooth, quiet operation.
* **Adjustable Shelves:** Adjustable shelves allow you to customize the cabinet interior to accommodate different items.
* **Pull-Out Shelves:** Pull-out shelves provide easy access to items stored in the back of the cabinet.
* **Drawer Organizers:** Drawer organizers help you keep your drawers neat and organized.
* **Corner Cabinet Solutions:** Corner cabinet solutions, such as lazy Susans and pull-out shelves, maximize storage space in corner cabinets.
### 2.4. Utilizing Lowe’s Kitchen Design Services
Lowe’s offers kitchen design services to help you plan and design your peninsula project. Their design experts can provide valuable assistance with layout, cabinet selection, and countertop selection. They can also create 3D renderings of your kitchen to help you visualize the finished product.
## 3. Installing Your Peninsula with Lowe’s Cabinets: A Step-by-Step Guide
Installing a peninsula is a challenging but rewarding DIY project. If you’re comfortable with basic carpentry skills, you can save money by installing the peninsula yourself. However, if you’re not confident in your abilities, it’s best to hire a professional installer.
### 3.1. Preparing the Installation Area
Before you begin the installation, prepare the area by:
* **Clearing the Space:** Remove any existing cabinets, appliances, or other obstructions from the installation area.
* **Protecting the Floor:** Cover the floor with drop cloths or cardboard to protect it from damage.
* **Locating Studs:** Use a stud finder to locate the wall studs behind the drywall. Mark the location of the studs with a pencil.
* **Turning Off Utilities:** Turn off the water supply to the kitchen sink and the electrical power to the outlets in the installation area.
### 3.2. Assembling and Leveling the Base Cabinets
Assemble the base cabinets according to the manufacturer’s instructions. Ensure the cabinets are level by using shims if necessary. Secure the cabinets to each other using screws or clamps.
### 3.3. Securing the Cabinets to the Floor and Wall
Once the cabinets are assembled and leveled, secure them to the floor and wall using screws. Use screws that are long enough to penetrate the floor joists or wall studs. Ensure the cabinets are securely attached to prevent them from shifting or tipping.
### 3.4. Installing the Countertop
Install the countertop according to the manufacturer’s instructions. Apply adhesive to the top of the cabinets and carefully position the countertop on top. Secure the countertop to the cabinets using screws or clamps. Allow the adhesive to dry completely before using the countertop.
### 3.5. Connecting Plumbing and Electrical
If you’re relocating plumbing or electrical outlets, hire a licensed plumber or electrician to make the connections. Ensure the connections comply with local codes.
### 3.6. Adding Finishing Touches
Add the finishing touches to your peninsula by installing cabinet hardware, such as knobs, pulls, and hinges. Install any trim or molding to conceal gaps or seams. Clean the cabinets and countertop to remove any dust or debris.
## 4. Maximizing the Functionality of Your Peninsula with Lowe’s Cabinets
Your peninsula is more than just extra counter space; it’s an opportunity to enhance the functionality and efficiency of your kitchen. Consider these tips for maximizing the functionality of your peninsula:
### 4.1. Incorporating Storage Solutions
Optimize your peninsula’s storage capacity by incorporating a variety of storage solutions, such as:
* **Drawers:** Drawers provide easy access to items stored in the back of the cabinet.
* **Pull-Out Shelves:** Pull-out shelves allow you to reach items without bending or kneeling.
* **Corner Cabinet Solutions:** Corner cabinet solutions, such as lazy Susans and pull-out shelves, maximize storage space in corner cabinets.
* **Wine Racks:** Wine racks provide a convenient and stylish way to store your wine collection.
* **Spice Racks:** Spice racks keep your spices organized and within easy reach.
### 4.2. Creating a Functional Workstation
Transform your peninsula into a functional workstation by incorporating features such as:
* **Cutting Board:** A built-in cutting board provides a convenient surface for food preparation.
* **Knife Block:** A knife block keeps your knives organized and within easy reach.
* **Utensil Holders:** Utensil holders keep your cooking utensils organized and accessible.
* **Electrical Outlets:** Electrical outlets provide power for appliances, such as blenders, food processors, and coffee makers.
### 4.3. Designing a Comfortable Seating Area
If you’re using the peninsula as a breakfast bar or seating area, ensure it’s comfortable and inviting. Consider these factors:
* **Countertop Height:** Choose a countertop height that’s comfortable for sitting. A standard countertop height is 36 inches, but you may want to consider a taller countertop height if you plan to use bar stools.
* **Seating Type:** Choose seating that’s comfortable and stylish. Consider bar stools, chairs, or a combination of both.
* **Legroom:** Provide adequate legroom for comfortable seating. A minimum of 12 inches of legroom is recommended.
* **Lighting:** Install adequate lighting to illuminate the seating area. Consider pendant lights or recessed lights.
### 4.4. Adding Decorative Elements
Enhance the aesthetic appeal of your peninsula by adding decorative elements, such as:
* **Backsplash:** A backsplash protects the wall behind the countertop from splashes and stains. Choose a backsplash that complements your cabinets and countertop.
* **Pendant Lights:** Pendant lights add visual interest and provide task lighting for the peninsula.
* **Artwork:** Artwork can add a personal touch to your kitchen and complement your overall décor.
* **Plants:** Plants add a touch of greenery and life to your kitchen.
## 5. Maintaining Your Peninsula with Lowe’s Cabinets
Proper maintenance will help keep your peninsula looking its best for years to come. Follow these tips for maintaining your peninsula:
### 5.1. Cleaning the Cabinets and Countertop
Clean the cabinets and countertop regularly with a mild soap and water solution. Avoid using harsh chemicals or abrasive cleaners, as they can damage the finish.
### 5.2. Protecting the Countertop from Damage
Protect the countertop from damage by using cutting boards, trivets, and coasters. Avoid placing hot pots or pans directly on the countertop, as they can scorch the surface.
### 5.3. Preventing Water Damage
Prevent water damage by wiping up spills immediately. Avoid leaving standing water on the countertop or cabinets.
### 5.4. Inspecting and Repairing Damage
Inspect the cabinets and countertop regularly for any signs of damage, such as scratches, dents, or cracks. Repair any damage promptly to prevent it from worsening.
## 6. Q&A: Expert Answers to Your Peninsula Questions
Here are some frequently asked questions about adding a peninsula with Lowe’s cabinets, along with expert answers:
**Q1: What is the ideal depth for a kitchen peninsula used primarily for food preparation?**
A1: For optimal food preparation, a peninsula depth of at least 24 inches is recommended. This provides ample workspace for chopping, mixing, and other tasks.
**Q2: Can I install a dishwasher in a peninsula? What considerations are important?**
A2: Yes, you can install a dishwasher in a peninsula. Key considerations include ensuring adequate plumbing and electrical connections, proper ventilation, and sufficient space for the dishwasher door to open fully without obstruction.
**Q3: What type of countertop material is most resistant to staining and scratches for a peninsula used heavily?**
A3: Quartz countertops are highly resistant to staining and scratches, making them an excellent choice for heavily used peninsulas. Granite is also a durable option, but requires regular sealing to prevent staining.
**Q4: How can I maximize storage in a narrow peninsula?**
A4: Utilize pull-out shelves, vertical dividers, and narrow drawers to maximize storage in a narrow peninsula. Consider incorporating a toe-kick drawer for additional storage space.
**Q5: What is the best way to support a peninsula that is not attached to a wall?**
A5: A peninsula not attached to a wall requires proper support. This can be achieved using sturdy legs, a reinforced base cabinet, or a combination of both. Ensure the support system is strong enough to handle the weight of the countertop and any items placed on it.
**Q6: How do I choose the right cabinet hardware to complement my Lowe’s cabinets and peninsula design?**
A6: Select cabinet hardware that complements the style and finish of your cabinets. Consider the overall design of your kitchen and choose hardware that enhances the aesthetic appeal. Matte black and brushed nickel are popular choices that work well with a variety of cabinet styles.
**Q7: What are the code requirements for electrical outlets on a kitchen peninsula?**
A7: Electrical codes typically require at least one GFCI-protected outlet on a kitchen peninsula. Consult with a licensed electrician to ensure your peninsula complies with all local electrical codes.
**Q8: How can I incorporate lighting into my peninsula design to create a warm and inviting atmosphere?**
A8: Incorporate pendant lights, recessed lights, and under-cabinet lighting to create a warm and inviting atmosphere. Use dimmer switches to adjust the lighting to your desired level.
**Q9: What are the advantages and disadvantages of using a laminate countertop versus a solid surface countertop on a peninsula?**
A9: Laminate countertops are more affordable than solid surface countertops but are less durable and resistant to scratches and stains. Solid surface countertops offer superior durability and stain resistance but are more expensive.
**Q10: How can I ensure my peninsula design is ergonomic and comfortable for users of different heights?**
A10: Choose a countertop height that is comfortable for the primary users of the peninsula. Consider incorporating adjustable-height seating to accommodate users of different heights.
## Conclusion: Creating Your Dream Kitchen with a Lowe’s Peninsula
Adding a peninsula with Lowe’s cabinets is a fantastic way to enhance your kitchen’s functionality, storage, and style. By following this comprehensive guide, you can confidently plan, design, and install a peninsula that meets your specific needs and preferences. Remember to prioritize careful planning, accurate measurements, and quality materials for a lasting and satisfying result. With the right approach, your new peninsula will become the heart of your kitchen, providing a welcoming space for cooking, dining, and gathering with loved ones. Now it’s time to take the next step. Visit your local Lowe’s store, consult with their design experts, and start bringing your dream kitchen to life. Share your experiences with adding a peninsula with Lowe’s cabinets in the comments below!
