
Fix Loose Faucet Base: A Comprehensive Guide to Stability
Is your faucet wobbling precariously? A loose faucet base isn’t just annoying; it can lead to leaks, water damage, and even structural problems. You’ve come to the right place. This comprehensive guide provides expert insights and step-by-step instructions to fix a loose faucet base effectively and prevent future issues. We’ll cover everything from identifying the cause to implementing long-term solutions, ensuring a stable and leak-free faucet. Our goal is to provide you with the knowledge and confidence to tackle this common plumbing problem like a pro, saving you time, money, and potential headaches down the road. This article draws from years of experience in plumbing repair and maintenance, offering proven techniques and best practices.
Understanding the Loose Faucet Base Problem
A loose faucet base is more than just an aesthetic issue. It signifies underlying problems that require immediate attention. Ignoring it can lead to significant water wastage and costly repairs. This section delves into the anatomy of a faucet base, the common causes of looseness, and the potential consequences of neglecting the problem. We’ll explore the materials used in faucet construction and how they respond to wear and tear, providing a foundation for effective troubleshooting.
What is a Faucet Base?
The faucet base is the foundation that secures the faucet to the sink or countertop. It’s the part of the faucet assembly that sits flush against the mounting surface, providing stability and preventing movement. The base typically houses the faucet’s water supply connections and often incorporates a decorative escutcheon or plate to conceal the mounting hardware.
Common Causes of a Loose Faucet Base
Several factors can contribute to a loose faucet base:
* **Loose Mounting Nuts:** Over time, the nuts that secure the faucet to the sink or countertop can loosen due to vibration or temperature changes.
* **Corrosion:** Corrosion of the mounting hardware can weaken the connection and cause the base to become unstable.
* **Worn Washers:** Washers provide a seal between the faucet base and the mounting surface. Worn or damaged washers can reduce friction and allow the faucet to move.
* **Water Damage:** Prolonged exposure to water can damage the mounting surface or the faucet base itself, leading to looseness.
* **Improper Installation:** A faucet that was not properly installed initially is more likely to develop a loose base over time.
* **Sink Material Degradation:** In older sinks, the material around the faucet mounting holes can degrade, leading to a less secure fit.
Consequences of Ignoring a Loose Faucet Base
Neglecting a loose faucet base can have several negative consequences:
* **Water Leaks:** A loose base can compromise the seal between the faucet and the sink, leading to water leaks that waste water and increase your water bill.
* **Water Damage:** Leaking water can damage surrounding cabinets, floors, and walls, leading to costly repairs.
* **Mold Growth:** Moisture from leaks can create a breeding ground for mold, which can pose health risks.
* **Structural Damage:** In severe cases, prolonged water damage can weaken the structural integrity of the sink or countertop.
* **Increased Water Bill:** Even small leaks can add up over time, resulting in a significantly higher water bill.
Tools and Materials Needed to Fix a Loose Faucet Base
Before you begin, gather the necessary tools and materials. Having everything on hand will streamline the repair process and prevent unnecessary delays. This section provides a comprehensive list of essential items, along with recommendations for quality and durability. We’ll also cover safety precautions to ensure a safe and successful repair.
* **Adjustable Wrench:** Used to tighten or loosen mounting nuts.
* **Basin Wrench:** A specialized wrench designed to reach tight spaces under the sink.
* **Screwdrivers (Phillips and Flathead):** Used to remove or tighten screws.
* **Pliers:** For gripping and manipulating small parts.
* **Putty Knife or Scraper:** Used to remove old plumber’s putty or caulk.
* **Plumber’s Putty or Silicone Caulk:** Used to seal the base of the faucet and prevent leaks.
* **New Washers:** Replacement washers to ensure a tight seal.
* **Cleaning Supplies:** To clean the area around the faucet base.
* **Flashlight:** To provide adequate lighting under the sink.
* **Safety Glasses:** To protect your eyes from debris.
* **Gloves:** To protect your hands from dirt and chemicals.
* **Old Towels or Rags:** To absorb water and clean up spills.
Step-by-Step Guide to Tightening a Loose Faucet Base
This section provides a detailed, step-by-step guide to tightening a loose faucet base. Each step is clearly explained, with helpful tips and illustrations to ensure success. We’ll cover various faucet types and mounting configurations, offering tailored instructions for each scenario. We emphasize safety precautions and best practices throughout the process.
Step 1: Shut Off the Water Supply
Before you begin any plumbing work, it’s crucial to shut off the water supply to the faucet. Locate the shut-off valves under the sink and turn them clockwise until they are completely closed. If you don’t have shut-off valves, you’ll need to shut off the main water supply to your house.
Step 2: Clear the Area Under the Sink
Remove any items stored under the sink to create a clear workspace. This will make it easier to access the faucet mounting hardware and prevent accidental damage to your belongings.
Step 3: Inspect the Faucet Base
Carefully inspect the faucet base to identify the source of the looseness. Look for loose mounting nuts, corroded hardware, or damaged washers. This will help you determine the appropriate repair strategy.
Step 4: Tighten the Mounting Nuts
Locate the mounting nuts under the sink that secure the faucet to the countertop or sink. Use an adjustable wrench or basin wrench to tighten the nuts. Be careful not to overtighten them, as this could damage the faucet or the mounting surface. Tighten each nut gradually and evenly.
Step 5: Replace Worn Washers
If tightening the mounting nuts doesn’t solve the problem, the washers may be worn or damaged. Remove the faucet from the sink and replace the old washers with new ones. Make sure the washers are the correct size and type for your faucet.
Step 6: Apply Plumber’s Putty or Silicone Caulk
Before reinstalling the faucet, apply a bead of plumber’s putty or silicone caulk around the base of the faucet. This will create a watertight seal and prevent leaks. Smooth the putty or caulk with your finger to create a clean, even finish.
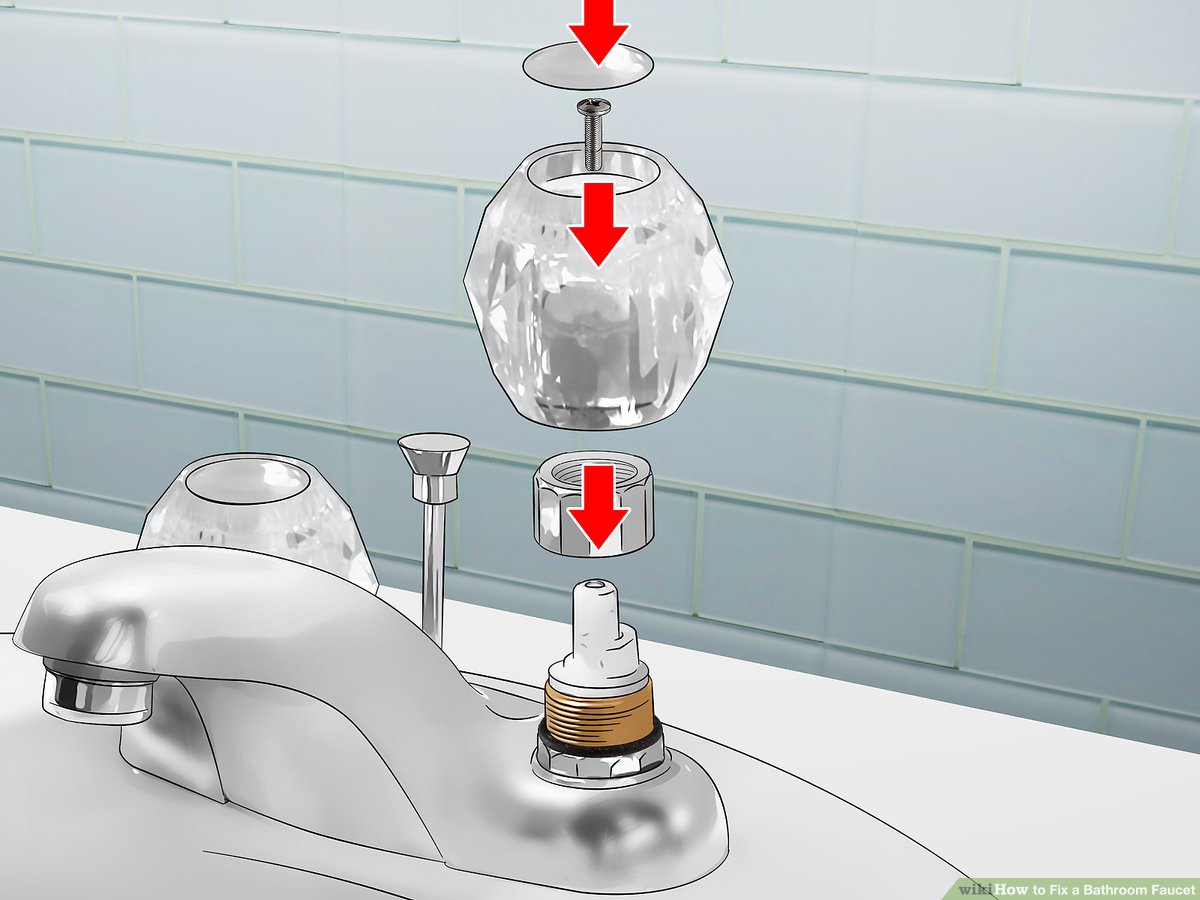
Step 7: Reinstall the Faucet
Carefully reinstall the faucet onto the sink or countertop. Align the faucet properly and tighten the mounting nuts until the faucet is secure. Be careful not to overtighten the nuts.
Step 8: Turn On the Water Supply
Slowly turn on the water supply and check for leaks around the base of the faucet. If you see any leaks, tighten the mounting nuts further or reapply plumber’s putty or silicone caulk.
Preventing Future Loose Faucet Base Issues
Prevention is always better than cure. This section provides proactive measures to prevent future loose faucet base issues. We’ll cover regular maintenance tips, proper installation techniques, and strategies for protecting your faucet from water damage and corrosion. Implementing these preventative measures will extend the life of your faucet and save you time and money in the long run.
* **Regularly Check Mounting Nuts:** Periodically check the mounting nuts under the sink to ensure they are tight. Tighten them as needed.
* **Use Quality Washers:** When replacing washers, use high-quality washers that are resistant to wear and tear.
* **Protect from Water Damage:** Keep the area around the faucet base dry to prevent water damage. Wipe up any spills promptly.
* **Apply Sealant:** Apply a bead of plumber’s putty or silicone caulk around the base of the faucet to create a watertight seal.
* **Proper Installation:** Ensure that the faucet is properly installed according to the manufacturer’s instructions.
* **Consider Faucet Stabilizer Brackets:** For heavier faucets or sinks that are prone to vibration, consider installing faucet stabilizer brackets for added support.
Choosing the Right Faucet: Factors to Consider
Selecting a durable and well-designed faucet can significantly reduce the likelihood of future issues. This section explores key factors to consider when choosing a new faucet, including material, construction, and mounting style. We’ll also discuss the importance of choosing a faucet that is compatible with your sink and plumbing system.
* **Material:** Choose a faucet made from high-quality materials, such as brass or stainless steel, which are resistant to corrosion and wear.
* **Construction:** Look for a faucet with solid construction and durable components. Avoid faucets with flimsy or plastic parts.
* **Mounting Style:** Consider the mounting style of the faucet and choose one that is appropriate for your sink and countertop. Common mounting styles include deck-mounted, wall-mounted, and widespread.
* **Compatibility:** Ensure that the faucet is compatible with your sink and plumbing system. Check the faucet’s dimensions and water supply connections to ensure a proper fit.
* **Warranty:** Choose a faucet with a good warranty to protect against defects in materials or workmanship.
Advanced Techniques for Stabilizing a Loose Faucet Base
In some cases, simply tightening the mounting nuts or replacing the washers may not be enough to stabilize a loose faucet base. This section explores advanced techniques for addressing more complex situations, such as damaged mounting surfaces or corroded hardware. We’ll cover methods for reinforcing the mounting surface, repairing damaged threads, and replacing corroded components.
* **Reinforcing the Mounting Surface:** If the mounting surface is damaged or weakened, you can reinforce it with a piece of plywood or metal. Cut the reinforcing material to the appropriate size and shape and attach it to the underside of the sink or countertop with adhesive or screws.
* **Repairing Damaged Threads:** If the threads on the mounting studs are damaged, you can repair them with a thread repair kit. These kits typically include a tap and die set that allows you to clean and re-thread the studs.
* **Replacing Corroded Components:** If the mounting hardware is severely corroded, you may need to replace it. Purchase replacement hardware from a plumbing supply store and install it according to the manufacturer’s instructions.
The Role of Plumber’s Putty: An Expert’s Perspective
Plumber’s putty is a versatile sealant used to create watertight connections in plumbing applications. This section provides an in-depth look at plumber’s putty, including its composition, properties, and proper application techniques. We’ll also discuss the advantages and disadvantages of using plumber’s putty compared to other sealants, such as silicone caulk.
Plumber’s putty is a moldable, clay-like substance that is used to seal joints and prevent leaks. It is typically made from a mixture of mineral oil, clay, and talc. Plumber’s putty is easy to apply and can be molded to fit any shape or size. It is also relatively inexpensive.
However, plumber’s putty has some limitations. It can dry out and crack over time, which can compromise the seal. It is also not suitable for use in high-pressure applications.
Silicone caulk is a more durable and flexible sealant than plumber’s putty. It is resistant to water, heat, and chemicals. Silicone caulk is also more expensive than plumber’s putty.
Product Spotlight: Faucet Stabilizer Brackets
Faucet stabilizer brackets provide additional support for faucets, preventing them from loosening over time. This section features a detailed review of faucet stabilizer brackets, including their design, installation, and benefits. We’ll also discuss different types of stabilizer brackets and provide recommendations for choosing the right one for your faucet.
Faucet stabilizer brackets are typically made from metal or plastic and are designed to attach to the underside of the sink or countertop. They provide additional support for the faucet, preventing it from wobbling or loosening over time. Stabilizer brackets are particularly useful for heavier faucets or sinks that are prone to vibration.
Installation of faucet stabilizer brackets is relatively simple and can be done with basic tools. The brackets are typically attached to the underside of the sink or countertop with screws or adhesive.
The Advantages of a Stable Faucet Base
A stable faucet base offers numerous advantages, including preventing leaks, reducing water damage, and extending the life of your faucet. This section highlights the key benefits of maintaining a tight and secure faucet base, emphasizing the long-term cost savings and peace of mind that come with proper maintenance.
* **Prevents Leaks:** A stable faucet base prevents leaks by maintaining a tight seal between the faucet and the sink or countertop.
* **Reduces Water Damage:** By preventing leaks, a stable faucet base reduces the risk of water damage to surrounding cabinets, floors, and walls.
* **Extends Faucet Life:** A stable faucet base reduces stress on the faucet’s components, extending its life and preventing premature failure.
* **Saves Water:** By preventing leaks, a stable faucet base helps conserve water and reduce your water bill.
* **Provides Peace of Mind:** Knowing that your faucet is securely mounted and leak-free provides peace of mind and reduces the risk of costly repairs.
Expert Review: Delta Faucet 21984LF Classic Two Handle Kitchen Faucet
The Delta Faucet 21984LF Classic Two Handle Kitchen Faucet is a popular choice for homeowners looking for a durable and reliable faucet. This section provides an in-depth review of the Delta Faucet 21984LF, covering its features, performance, and overall value. We’ll also discuss its strengths and weaknesses, and provide a recommendation for who this faucet is best suited for.
The Delta Faucet 21984LF features a classic two-handle design, a durable brass construction, and a ceramic disc valve for smooth and leak-free operation. It also includes a side sprayer for added convenience.
**Pros:**
* Durable brass construction
* Ceramic disc valve for leak-free operation
* Classic two-handle design
* Includes side sprayer
* Easy to install
**Cons:**
* Traditional design may not appeal to all homeowners
* Side sprayer may not be as powerful as some other models
* Limited finish options
**Ideal User Profile:**
The Delta Faucet 21984LF is best suited for homeowners who are looking for a durable and reliable faucet with a classic design. It is a good choice for those who appreciate the convenience of a side sprayer.
**Alternatives:**
* Moen 87024SRS Edwyn Two-Handle High-Arc Kitchen Faucet
* Kohler K-10433-VS Forte Two-Handle Kitchen Sink Faucet
**Expert Overall Verdict & Recommendation:**
The Delta Faucet 21984LF is a solid choice for homeowners who are looking for a durable and reliable faucet with a classic design. Its durable construction, leak-free operation, and convenient side sprayer make it a good value for the money. We recommend this faucet for those who appreciate its traditional style and want a faucet that will last for years to come.
Q&A: Addressing Common Concerns About Loose Faucet Bases
This section answers frequently asked questions about loose faucet bases, providing expert advice and practical solutions to common problems. We’ll address concerns about specific faucet types, mounting configurations, and repair techniques.
**Q1: My faucet is loose even after tightening the mounting nuts. What could be the problem?**
*A1:* If tightening the mounting nuts doesn’t work, the washers may be worn or the mounting surface may be damaged. Replace the washers or reinforce the mounting surface.
**Q2: How do I remove a faucet that is stuck to the sink with old plumber’s putty?**
*A2:* Use a putty knife or scraper to carefully remove the old putty. You may need to apply some heat to soften the putty.
**Q3: Can I use silicone caulk instead of plumber’s putty to seal the base of my faucet?**
*A3:* Yes, silicone caulk is a good alternative to plumber’s putty. It is more durable and flexible.
**Q4: How do I prevent my faucet from loosening again after I fix it?**
*A4:* Regularly check the mounting nuts and tighten them as needed. Also, protect the area around the faucet base from water damage.
**Q5: My sink is made of acrylic. Can I still use plumber’s putty on it?**
*A5:* Yes, you can use plumber’s putty on acrylic sinks. However, be careful not to scratch the surface.
**Q6: What is the best way to clean old plumber’s putty off of a sink?**
*A6:* Use a putty knife or scraper to remove the bulk of the putty. Then, use a solvent such as mineral spirits to remove any residue.
**Q7: Are faucet stabilizer brackets necessary?**
*A7:* Faucet stabilizer brackets are not always necessary, but they can be helpful for heavier faucets or sinks that are prone to vibration.
**Q8: How do I know what size washers to use when replacing them?**
*A8:* Measure the old washers or consult the faucet’s manufacturer’s specifications.
**Q9: Can a loose faucet base cause damage to my plumbing?**
*A9:* Yes, a loose faucet base can cause leaks that can damage your plumbing and surrounding structures.
**Q10: Is it worth hiring a plumber to fix a loose faucet base?**
*A10:* If you are not comfortable with plumbing repairs, it is best to hire a plumber to fix a loose faucet base.
Conclusion: Ensuring a Stable and Leak-Free Faucet
Fixing a loose faucet base is a manageable task with the right knowledge and tools. By understanding the causes, following our step-by-step guide, and implementing preventative measures, you can ensure a stable and leak-free faucet for years to come. Remember that a stable faucet not only prevents water waste and damage but also contributes to the overall functionality and aesthetic appeal of your kitchen or bathroom. We’ve shared insights gained from years of plumbing experience, and following these tips will help you achieve professional-quality results. Consider sharing your experiences with fixing loose faucet bases in the comments below. Your insights could help others facing similar challenges. Explore our advanced guide to faucet maintenance for more in-depth information.
