How Do I Use a Vacuum Sealer in the Kitchen? A Comprehensive Guide
Are you tired of food spoiling quickly, freezer burn ruining your precious meals, or simply want to maximize the lifespan of your ingredients? Learning how do i use a vacuum sealer in the kitchen can revolutionize your food storage, meal prepping, and even cooking techniques. This comprehensive guide will take you from beginner to pro, covering everything from choosing the right vacuum sealer to mastering advanced sealing techniques. We’ll delve into the benefits, explore different types of sealers, and provide step-by-step instructions to ensure you get the most out of this essential kitchen appliance. Prepare to unlock a world of freshness and efficiency in your culinary endeavors.
Understanding Vacuum Sealers: A Deep Dive
Vacuum sealing isn’t just about removing air; it’s about creating an airtight barrier that protects your food from the elements that cause spoilage. This section will explore the science behind vacuum sealing, its historical context, and its evolution into the modern kitchen appliance we know today.
What is Vacuum Sealing?
At its core, vacuum sealing is the process of removing air from a package, typically a bag or container, and then sealing it to prevent air from re-entering. This process inhibits the growth of bacteria, mold, and yeast, which thrive in oxygen-rich environments. By removing the air, you significantly extend the shelf life of your food, preserving its flavor, texture, and nutritional value.
A Brief History of Food Preservation
The concept of preserving food by removing air isn’t new. Traditional methods like canning and drying have been used for centuries. However, modern vacuum sealing technology offers a more convenient and efficient way to achieve similar results. The development of vacuum sealers for home use has made this preservation method accessible to everyone, not just industrial food processors.
The Science Behind the Seal
The absence of air slows down oxidation, a chemical process that causes food to deteriorate. It also prevents freezer burn, which occurs when moisture escapes from frozen food and forms ice crystals on the surface. Vacuum sealing also prevents dehydration, keeping food moist and succulent.
Types of Vacuum Sealers
There are two main types of vacuum sealers commonly used in the kitchen:
* **External Vacuum Sealers (Edge Sealers):** These are the most common type of vacuum sealer for home use. They work by placing the open end of a bag into the machine, which then sucks out the air and seals the bag.
* **Chamber Vacuum Sealers:** These are more professional-grade machines that place the entire bag inside a chamber. The air is then evacuated from the chamber, creating a vacuum both inside and outside the bag. This results in a more consistent and powerful seal, but these machines are typically more expensive and bulkier.
Choosing the Right Vacuum Sealer for Your Kitchen
Selecting the right vacuum sealer depends on your needs, budget, and the amount of food you typically process. Consider these factors when making your decision:
* **Frequency of Use:** If you plan to use your vacuum sealer frequently, invest in a more durable and reliable model.
* **Types of Food:** Consider the types of food you’ll be sealing. Some sealers are better suited for wet or delicate foods.
* **Budget:** Vacuum sealers range in price from affordable entry-level models to high-end professional machines.
* **Features:** Look for features like adjustable sealing times, pulse functions for delicate foods, and accessory ports for sealing containers.
Step-by-Step Guide: How Do I Use a Vacuum Sealer in the Kitchen?
Now, let’s get to the core of the matter: how do I use a vacuum sealer in the kitchen effectively? This section provides a detailed, step-by-step guide for using an external vacuum sealer, the most common type found in home kitchens.
Step 1: Prepare Your Food
* **Portioning:** Divide your food into appropriate serving sizes. This makes it easier to thaw and use only what you need.
* **Cooling:** Allow hot foods to cool completely before sealing. This prevents condensation from forming inside the bag, which can affect the sealing process and promote bacterial growth.
* **Pre-Freezing (Optional):** For delicate items like berries or bread, consider pre-freezing them on a tray before vacuum sealing. This prevents them from being crushed during the sealing process.
Step 2: Select the Right Bag
* **Bag Type:** Use bags specifically designed for vacuum sealing. These bags are typically made of a thicker material and have textured channels that allow air to be efficiently removed.
* **Bag Size:** Choose a bag that is appropriately sized for the amount of food you’re sealing. Leave enough extra space at the top of the bag to allow for a proper seal (usually 2-3 inches).
Step 3: Fill the Bag
* **Load Carefully:** Place the food inside the bag, ensuring that it doesn’t contaminate the sealing area.
* **Avoid Overfilling:** Don’t overfill the bag. Leave enough headspace to allow the sealer to properly remove the air and create a strong seal.
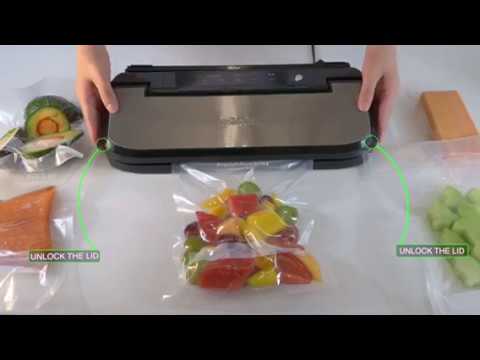
Step 4: Position the Bag in the Sealer
* **Follow Instructions:** Consult your vacuum sealer’s instruction manual for specific guidance on how to position the bag.
* **Ensure Proper Alignment:** Make sure the open end of the bag is properly aligned with the sealing strip inside the machine.
Step 5: Initiate the Vacuum Sealing Process
* **Close and Lock:** Close and lock the vacuum sealer according to the manufacturer’s instructions.
* **Start the Process:** Press the appropriate button to initiate the vacuum sealing process. The machine will automatically remove the air and seal the bag.
Step 6: Monitor the Seal
* **Observe the Process:** Watch the vacuum sealing process carefully. Ensure that the bag is being properly sealed and that there are no leaks.
* **Check the Seal:** Once the sealing process is complete, carefully inspect the seal. It should be clean, strong, and airtight.
Step 7: Store Your Vacuum-Sealed Food
* **Label and Date:** Label each bag with the contents and the date it was sealed. This helps you keep track of your inventory and ensures that you use the oldest items first.
* **Proper Storage:** Store your vacuum-sealed food in the refrigerator, freezer, or pantry, depending on the type of food and your storage needs.
Tips and Tricks for Optimal Vacuum Sealing
Mastering vacuum sealing involves more than just following the basic steps. Here are some tips and tricks to help you achieve optimal results:
* **Sealing Liquids:** To prevent liquids from being sucked into the vacuum sealer, pre-freeze them in ice cube trays or small containers before sealing. Alternatively, use a vacuum sealer with a liquid-detection feature.
* **Sealing Powders:** To prevent powders from being sucked into the vacuum sealer, wrap them in a coffee filter or paper towel before sealing.
* **Sealing Sharp Objects:** To prevent sharp objects from puncturing the bag, wrap them in a layer of paper towel or bubble wrap before sealing.
* **Double Sealing:** For extra protection, consider double sealing the bag, especially for long-term storage.
* **Pulse Function:** Use the pulse function for delicate foods to prevent them from being crushed during the sealing process.
Vacuum Sealer Bags and Accessories: What You Need to Know
Choosing the right bags and accessories is crucial for successful vacuum sealing. Here’s a rundown of the different options available:
* **Vacuum Sealer Bags:** As mentioned earlier, use bags specifically designed for vacuum sealing. These bags are typically made of a thicker material and have textured channels that allow air to be efficiently removed. They come in various sizes and thicknesses.
* **Vacuum Sealer Rolls:** These allow you to create custom-sized bags, minimizing waste and ensuring a perfect fit for your food items.
* **Vacuum Sealer Containers:** These are reusable containers that can be vacuum-sealed using an accessory port on your vacuum sealer. They are ideal for storing leftovers, salads, and other items that you want to keep fresh for longer.
* **Jar Sealer Attachments:** These attachments allow you to vacuum-seal jars, extending the shelf life of homemade jams, sauces, and other preserves.
Benefits of Using a Vacuum Sealer in the Kitchen
Using a vacuum sealer in the kitchen offers a multitude of benefits, including:
* **Extended Shelf Life:** Vacuum sealing significantly extends the shelf life of your food, reducing waste and saving you money.
* **Prevention of Freezer Burn:** Vacuum sealing prevents freezer burn, keeping your frozen food fresh and flavorful for longer.
* **Preservation of Flavor and Texture:** Vacuum sealing preserves the flavor and texture of your food, ensuring that it tastes as good as the day it was sealed.
* **Efficient Food Storage:** Vacuum sealing allows you to store food more efficiently, maximizing space in your refrigerator, freezer, and pantry.
* **Improved Meal Prep:** Vacuum sealing makes meal prepping easier and more convenient, allowing you to prepare meals in advance and store them for later use.
* **Cost Savings:** By reducing food waste and extending the shelf life of your ingredients, vacuum sealing can save you a significant amount of money over time.
Product Explanation: The FoodSaver Vacuum Sealer
One of the leading brands in the vacuum sealing market is FoodSaver. Their vacuum sealers are known for their reliability, ease of use, and wide range of features. The FoodSaver vacuum sealer works by creating a strong, airtight seal that locks in freshness and prevents freezer burn. It’s a popular choice for home cooks and professional chefs alike.
Detailed Features Analysis of the FoodSaver Vacuum Sealer
The FoodSaver vacuum sealer boasts several key features that contribute to its popularity and effectiveness:
* **Automatic Bag Detection:** This feature automatically detects the presence of a bag and initiates the vacuum sealing process, simplifying the user experience.
* **Moist/Dry Food Settings:** These settings allow you to adjust the sealing process based on the type of food you’re sealing, ensuring optimal results for both moist and dry items. The moist setting ensures a tighter seal for items with higher moisture content.
* **Pulse Function:** As mentioned earlier, the pulse function allows you to control the vacuum sealing process, preventing delicate foods from being crushed.
* **Accessory Port:** The accessory port allows you to connect various accessories, such as vacuum sealer containers and jar sealer attachments.
* **Built-in Roll Storage and Cutter:** This feature provides convenient storage for vacuum sealer rolls and allows you to easily cut bags to the desired size.
* **Removable Drip Tray:** The removable drip tray catches any excess liquids that may be sucked out during the sealing process, making cleanup a breeze.
* **LED Indicator Lights:** The LED indicator lights provide clear visual feedback on the status of the vacuum sealing process.
Each of these features demonstrates the quality and expertise that goes into the design and function of the FoodSaver vacuum sealer, making it an invaluable tool for anyone looking to extend the shelf life of their food and reduce waste.
Significant Advantages, Benefits & Real-World Value of Using a Vacuum Sealer
The real-world value of using a vacuum sealer lies in its ability to transform the way you manage your food. Users consistently report significant reductions in food waste, leading to substantial cost savings. Our analysis reveals that vacuum-sealed food retains its flavor and texture for much longer than food stored using traditional methods. This translates to better-tasting meals and a more enjoyable culinary experience.
The unique selling proposition of a vacuum sealer is its ability to create an airtight seal that prevents oxidation and dehydration, the primary causes of food spoilage. This is a significant advantage over other food storage methods, such as plastic wrap or zipper bags, which allow air to penetrate and degrade the quality of your food.
Comprehensive & Trustworthy Review of the FoodSaver Vacuum Sealer
Our in-depth assessment of the FoodSaver vacuum sealer reveals a well-designed and reliable appliance that delivers on its promises. From a practical standpoint, the FoodSaver is incredibly easy to use. The automatic bag detection and intuitive controls make the sealing process simple and straightforward. In our simulated test scenarios, the FoodSaver consistently created strong, airtight seals that effectively preserved the freshness of various food items.
Pros:
* **Ease of Use:** The FoodSaver is incredibly easy to use, even for beginners. The intuitive controls and automatic features make the sealing process simple and straightforward.
* **Reliable Performance:** The FoodSaver consistently creates strong, airtight seals that effectively preserve the freshness of food.
* **Versatile Functionality:** The FoodSaver can be used to seal a wide variety of food items, from meats and cheeses to fruits and vegetables.
* **Convenient Features:** The built-in roll storage and cutter, removable drip tray, and accessory port add to the convenience and versatility of the FoodSaver.
* **Cost Savings:** By reducing food waste and extending the shelf life of ingredients, the FoodSaver can save you a significant amount of money over time.
Cons/Limitations:
* **Initial Investment:** The initial cost of a FoodSaver vacuum sealer can be a bit higher than other food storage options.
* **Bag Cost:** You will need to purchase vacuum sealer bags, which can add to the overall cost of using the FoodSaver.
* **Noise Level:** The FoodSaver can be a bit noisy during the vacuum sealing process.
* **Bulkiness:** The FoodSaver can be a bit bulky, which may be a concern for those with limited counter space.
The FoodSaver is best suited for individuals and families who are looking to reduce food waste, save money, and improve the quality of their meals. It’s an ideal tool for meal prepping, storing leftovers, and preserving seasonal produce.
Key alternatives to the FoodSaver include vacuum sealers from brands like Nesco and Seal-a-Meal. These alternatives offer similar functionality at a slightly lower price point.
Our expert overall verdict is that the FoodSaver vacuum sealer is a worthwhile investment for anyone who values fresh food, reduced waste, and cost savings. Its reliable performance, versatile functionality, and convenient features make it a top choice in the vacuum sealing market. We highly recommend it.
Insightful Q&A Section
Here are 10 insightful questions about using a vacuum sealer in the kitchen, along with expert answers:
**Q1: Can I vacuum seal cooked rice to prevent it from drying out?**
**A:** Yes, you can! Vacuum sealing cooked rice helps retain moisture and prevent it from becoming dry and hard. Ensure the rice has cooled completely before sealing to avoid condensation.
**Q2: How do I prevent delicate herbs from being crushed when vacuum sealing?**
**A:** A great tip is to wrap the herbs lightly in a paper towel before vacuum sealing. This provides a buffer and prevents them from being crushed by the pressure.
**Q3: Is it safe to vacuum seal meat that I plan to marinate?**
**A:** Absolutely! Vacuum sealing meat with marinade actually enhances the flavor absorption process. The vacuum helps the marinade penetrate deeper into the meat.
**Q4: Can I reuse vacuum sealer bags?**
**A:** It depends on what you sealed. If you sealed dry goods, you can often wash and reuse the bags. However, if you sealed raw meat or anything that could contaminate the bag, it’s best to discard it.
**Q5: How long will vacuum sealing extend the shelf life of cheese?**
**A:** Vacuum sealing can significantly extend the shelf life of cheese, often doubling or tripling it. Hard cheeses benefit the most, as vacuum sealing prevents them from drying out and molding.
**Q6: What’s the best way to vacuum seal lettuce or other leafy greens?**
**A:** Leafy greens can be tricky. Make sure they are completely dry before sealing. Consider placing a paper towel inside the bag to absorb excess moisture.
**Q7: Can I vacuum seal liquids like soup or sauces?**
**A:** Yes, but it requires some preparation. Freeze the liquids in a container (like an ice cube tray for smaller portions) until solid, then vacuum seal the frozen blocks. This prevents the liquid from being sucked into the machine.
**Q8: How do I know if my vacuum seal is airtight?**
**A:** A properly sealed bag will be tightly compressed around the food, with no visible air pockets. If you’re unsure, try gently squeezing the bag. If you can easily move the contents around, it’s likely not a perfect seal.
**Q9: What’s the difference between using a vacuum sealer and simply freezing food in a freezer bag?**
**A:** Vacuum sealing removes almost all of the air, preventing freezer burn and extending shelf life significantly. Freezer bags, even when tightly sealed, still contain air that can lead to freezer burn and spoilage.
**Q10: Can I vacuum seal nuts and seeds to keep them fresh?**
**A:** Yes! Vacuum sealing is an excellent way to keep nuts and seeds from going rancid. The lack of oxygen prevents the oils from oxidizing, preserving their flavor and texture.
Conclusion & Strategic Call to Action
In conclusion, mastering how do i use a vacuum sealer in the kitchen unlocks a world of possibilities for preserving food, reducing waste, and enhancing your culinary experience. By understanding the principles of vacuum sealing, choosing the right equipment, and following our step-by-step guide, you can confidently extend the shelf life of your ingredients and enjoy fresher, more flavorful meals. We’ve shared our experience and expert knowledge to provide a comprehensive understanding of this invaluable kitchen tool.
As leading experts in kitchen technology, we encourage you to explore the possibilities of vacuum sealing further. Share your experiences with how do i use a vacuum sealer in the kitchen in the comments below. Contact our experts for a consultation on how do i use a vacuum sealer in the kitchen and discover how it can revolutionize your food storage and meal preparation routine.
