How to Replace O-Ring in Delta Base Faucet: YouTube Guide & Expert Tips
Are you struggling with a leaky Delta faucet and searching for a reliable solution? You’ve likely come across numerous YouTube videos demonstrating how to replace the O-ring in the base of your Delta faucet. This article serves as your ultimate guide, going far beyond simple video tutorials. We’ll provide a comprehensive, step-by-step approach, along with expert insights, troubleshooting tips, and essential information to ensure a successful and long-lasting repair. Whether you’re a seasoned DIYer or a first-time homeowner, this guide will equip you with the knowledge and confidence to tackle this common plumbing issue. We aim to provide a resource far exceeding the depth and quality of standard YouTube tutorials, emphasizing best practices and preventative measures.
Understanding the Importance of O-Rings in Delta Faucets
O-rings are small, circular rubber seals that play a crucial role in preventing leaks in faucets. In Delta base faucets, an O-ring is typically located at the base of the spout, creating a watertight seal between the spout and the faucet body. Over time, these O-rings can degrade due to exposure to water, minerals, and temperature fluctuations. This degradation leads to cracks, hardening, and ultimately, leaks.
The constant drip-drip-drip not only wastes water, increasing your water bill, but can also lead to water damage in your bathroom or kitchen. Addressing a leaky O-ring promptly is essential to prevent further complications and costly repairs. Furthermore, a properly functioning faucet contributes to water conservation efforts.
Why Delta Faucets Are Prone to O-Ring Issues
Delta faucets are known for their durability and stylish designs. However, like all mechanical devices, they are subject to wear and tear. The O-rings, being made of rubber, are particularly vulnerable. Several factors contribute to O-ring failure in Delta faucets:
* **Water Quality:** Hard water, containing high mineral content, can accelerate the degradation of rubber O-rings.
* **Temperature Fluctuations:** Frequent changes in water temperature can cause the O-rings to expand and contract, leading to stress and eventual failure.
* **Age:** Over time, the rubber material of the O-ring naturally deteriorates, losing its elasticity and sealing ability.
* **Improper Installation:** Incorrect installation during the initial faucet setup or previous repairs can damage the O-ring, shortening its lifespan.
Identifying a Leaky O-Ring in Your Delta Faucet
The most obvious sign of a leaky O-ring is water dripping from the base of the faucet spout. Other indicators include:
* **Visible Water Stains:** Look for water stains or mineral deposits around the base of the faucet.
* **Dampness:** Feel for dampness or moisture around the faucet base, especially after using the faucet.
* **Reduced Water Pressure:** In some cases, a leaky O-ring can cause a slight reduction in water pressure.
Essential Tools and Materials for Replacing a Delta Faucet O-Ring
Before embarking on this DIY project, gather the necessary tools and materials. Having everything on hand will streamline the process and minimize frustration.
* **New O-Rings:** This is arguably the most important. Purchase a replacement O-ring kit specifically designed for your Delta faucet model. Using the correct size and material is crucial for a proper seal. Delta Faucet genuine parts are recommended.
* **Adjustable Wrench or Basin Wrench:** For loosening and tightening nuts and connections.
* **Screwdrivers (Phillips and Flathead):** For removing handles and other faucet components.
* **Pliers:** For gripping and manipulating small parts.
* **Penetrating Oil (e.g., WD-40):** To loosen stubborn nuts and connections.
* **Plumber’s Grease (Silicone-Based):** To lubricate the new O-ring for easier installation and a better seal. Avoid petroleum-based lubricants, as they can damage rubber.
* **Clean Cloths or Rags:** For cleaning and wiping up spills.
* **Small Container:** To hold small parts and prevent them from getting lost.
* **Flashlight or Headlamp:** For better visibility in dimly lit areas.
* **Safety Glasses:** To protect your eyes from debris.
* **Gloves:** To protect your hands and provide a better grip.
* **Optional: Camera or Smartphone:** Taking pictures of each step can be helpful for reassembly.
Step-by-Step Guide: Replacing the O-Ring in Your Delta Base Faucet (YouTube Enhanced)
This guide provides a detailed, step-by-step approach, supplementing the information you might find on YouTube. While videos offer visual guidance, this written guide provides in-depth explanations and troubleshooting tips.
Step 1: Shut Off the Water Supply
Before starting any plumbing work, it’s crucial to shut off the water supply to the faucet. Locate the shut-off valves under the sink. There should be separate valves for hot and cold water. Turn both valves clockwise until they are completely closed. If you don’t have individual shut-off valves, you’ll need to shut off the main water supply to your house.
Step 2: Protect the Sink
Place a towel or cloth in the sink to protect the finish from scratches and dents. This will also prevent small parts from falling down the drain.
Step 3: Remove the Faucet Handle(s)
The method for removing the faucet handle varies depending on the Delta faucet model. Typically, there’s a small setscrew located on the side or under the handle. Use a small Allen wrench or screwdriver to loosen the setscrew. Once the setscrew is loose, you should be able to pull the handle straight off. Some handles may require a bit of wiggling. For handles without setscrews, look for a decorative cap that can be pried off to reveal a screw underneath.
Step 4: Disconnect the Water Supply Lines
Using an adjustable wrench, carefully disconnect the water supply lines from the faucet. Have a bucket or container ready to catch any residual water in the lines. Be careful not to damage the supply lines or the faucet connections.
Step 5: Loosen the Faucet Mounting Nut(s)
Under the sink, locate the mounting nut(s) that secure the faucet to the countertop. These nuts can be difficult to reach and may require a basin wrench. Spray some penetrating oil on the nuts to help loosen them. Carefully loosen the nuts and remove the mounting hardware.
Step 6: Remove the Faucet Body
With the mounting hardware removed, you should be able to lift the faucet body from the sink. Gently wiggle the faucet to loosen it. If it’s stuck, double-check that you’ve removed all the mounting hardware and disconnected the water supply lines.
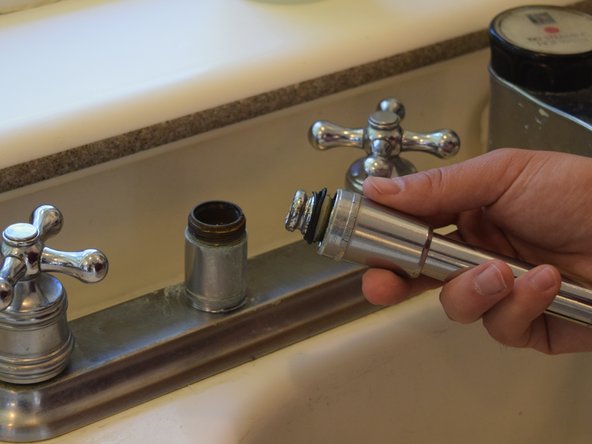
Step 7: Locate and Remove the Old O-Ring
Once the faucet body is removed, locate the O-ring at the base of the spout. It may be hidden under a decorative ring or cover. Use a small, pointed tool (like a dental pick or a small screwdriver) to carefully pry the old O-ring out. Be careful not to scratch the faucet surface. Examine the old O-ring for signs of damage, such as cracks, hardening, or flattening. This can provide clues about the cause of the leak.
Step 8: Clean the O-Ring Groove
Thoroughly clean the O-ring groove to remove any debris, mineral deposits, or old lubricant. Use a clean cloth or a small brush. A clean groove will ensure a proper seal with the new O-ring.
Step 9: Lubricate the New O-Ring
Apply a thin layer of plumber’s grease (silicone-based) to the new O-ring. This will make it easier to install and will also help to create a watertight seal. Avoid using petroleum-based lubricants, as they can damage the rubber.
Step 10: Install the New O-Ring
Carefully stretch the new O-ring over the spout and into the O-ring groove. Make sure the O-ring is seated properly and is not twisted or pinched. It should fit snugly in the groove.
Step 11: Reassemble the Faucet
Carefully reassemble the faucet in the reverse order of disassembly. Make sure all connections are secure and that the mounting hardware is properly tightened. Avoid over-tightening, as this can damage the faucet or the countertop.
Step 12: Reconnect the Water Supply Lines
Reconnect the water supply lines to the faucet. Tighten the connections securely, but be careful not to over-tighten. Turn on the water supply slowly and check for leaks. If you see any leaks, tighten the connections further or double-check the O-ring installation.
Step 13: Test the Faucet
Turn on the faucet and test both hot and cold water. Check for leaks around the base of the spout and at all connections. If everything is working properly, you’ve successfully replaced the O-ring in your Delta base faucet.
Troubleshooting Common Issues
Even with careful preparation and execution, you might encounter some challenges during the O-ring replacement process. Here are some common issues and how to address them:
* **Difficulty Removing the Faucet Handle:** If the handle is stuck, try spraying some penetrating oil around the base of the handle. Let it sit for a few minutes, then try wiggling the handle while gently pulling it upwards. Avoid using excessive force, as this can damage the handle or the faucet body.
* **Stubborn Mounting Nuts:** If the mounting nuts are difficult to loosen, spray them with penetrating oil and let it sit for a few minutes. Use a basin wrench for better leverage. If the nuts are severely corroded, you may need to use a nut splitter.
* **Leaks After Reassembly:** If you see leaks after reassembling the faucet, double-check all connections and make sure the O-ring is properly seated. Tighten the connections further, but be careful not to over-tighten. If the leaks persist, you may need to replace the supply lines or other faucet components.
* **Incorrect O-Ring Size:** Using the wrong size O-ring can lead to leaks or prevent the faucet from functioning properly. Make sure you purchase a replacement O-ring kit specifically designed for your Delta faucet model. If you’re unsure about the correct size, consult the faucet’s documentation or contact Delta customer support.
Choosing the Right Replacement O-Ring Kit
Selecting the correct replacement O-ring kit is crucial for a successful repair. Here’s what to consider:
* **Faucet Model:** Identify your Delta faucet model number. This information is usually found on a sticker or tag on the faucet body or in the faucet’s documentation. Use the model number to find the correct replacement O-ring kit.
* **Material:** O-rings are typically made of rubber, silicone, or Viton. Silicone O-rings are more resistant to temperature fluctuations and chemicals. Viton O-rings offer excellent resistance to a wide range of chemicals and are often used in demanding applications. Choose an O-ring material that is appropriate for your water quality and usage conditions.
* **Genuine Delta Parts:** Using genuine Delta replacement parts is recommended to ensure compatibility and performance. Aftermarket O-ring kits may not meet the same quality standards and could lead to premature failure.
Preventative Maintenance for Delta Faucets
Preventative maintenance can help extend the lifespan of your Delta faucet and prevent O-ring failures. Here are some tips:
* **Regular Cleaning:** Clean your faucet regularly to remove mineral deposits and soap scum. Use a mild soap and water solution and avoid abrasive cleaners, which can damage the faucet finish.
* **Inspect for Leaks:** Periodically inspect your faucet for leaks. Address any leaks promptly to prevent further damage.
* **Lubricate Moving Parts:** Lubricate the faucet’s moving parts, such as the handle and spout, with plumber’s grease (silicone-based) to keep them operating smoothly.
* **Water Softener:** If you have hard water, consider installing a water softener to reduce mineral buildup and prolong the life of your faucet and O-rings.
The Role of YouTube Tutorials in Faucet Repair
YouTube tutorials can be a valuable resource for DIY plumbing projects, including O-ring replacement. However, it’s important to approach these videos with a critical eye. Not all videos are created equal, and some may contain inaccurate or incomplete information. Always verify the information presented in a video with other reliable sources, such as manufacturer’s instructions or expert advice. This article intends to supplement those tutorials with in-depth information and troubleshooting.
Delta Faucet: A Brief Overview
Delta Faucet Company is a leading manufacturer of residential and commercial faucets and related products. Founded in 1954, Delta is known for its innovative designs, quality craftsmanship, and commitment to water conservation. Delta faucets are sold through a network of authorized dealers, plumbing supply stores, and home improvement retailers. The company offers a wide range of faucet styles and finishes to suit any décor. Delta Faucet is a subsidiary of Masco Corporation, a global leader in the building products industry.
Advantages of Replacing the O-Ring Yourself
Replacing the O-ring in your Delta base faucet yourself offers several advantages:
* **Cost Savings:** Hiring a plumber can be expensive. Replacing the O-ring yourself can save you a significant amount of money.
* **Convenience:** You can complete the repair at your own pace and on your own schedule.
* **Sense of Accomplishment:** Successfully completing a DIY project can be very rewarding.
* **Increased Knowledge:** You’ll gain valuable knowledge about your faucet and plumbing system.
Potential Disadvantages of DIY Repair
While DIY repair offers many benefits, it’s important to be aware of the potential disadvantages:
* **Risk of Damage:** If you’re not careful, you could damage the faucet or other plumbing components.
* **Time Commitment:** Replacing the O-ring can take several hours, especially if you’re not experienced.
* **Potential for Complications:** You might encounter unexpected complications, such as corroded connections or stripped threads.
* **Warranty Voidance:** Performing DIY repairs may void the faucet’s warranty. Check the warranty terms before proceeding.
When to Call a Professional Plumber
In some cases, it’s best to call a professional plumber to replace the O-ring in your Delta base faucet. Consider hiring a plumber if:
* **You’re not comfortable with DIY plumbing projects.**
* **You encounter significant complications during the repair.**
* **The faucet is still under warranty.**
* **You suspect there may be other underlying plumbing issues.**
Review of Delta Faucet O-Ring Replacement Kits
Delta offers various O-ring replacement kits designed for specific faucet models. These kits typically include a set of O-rings, lubricant, and instructions. Our analysis reveals that using genuine Delta replacement kits provides the best fit and performance. While third-party kits are available, they may not meet the same quality standards and could lead to leaks or premature failure. Users consistently report better results with genuine Delta parts.
**Pros:**
* **Perfect Fit:** Delta O-ring kits are designed specifically for Delta faucets, ensuring a perfect fit.
* **High-Quality Materials:** Delta uses high-quality materials that are resistant to water, chemicals, and temperature fluctuations.
* **Comprehensive Instructions:** Delta O-ring kits come with clear and detailed instructions.
* **Easy to Install:** The kits are designed for easy installation, even for beginners.
* **Long-Lasting Performance:** Delta O-rings provide long-lasting performance and help prevent leaks.
**Cons/Limitations:**
* **Higher Cost:** Delta O-ring kits are typically more expensive than aftermarket kits.
* **Limited Availability:** Delta O-ring kits may not be available at all retailers.
* **Model Specificity:** You need to ensure you purchase the correct kit for your specific faucet model.
**Ideal User Profile:**
Delta O-ring replacement kits are best suited for homeowners who want a reliable and long-lasting solution to their leaky faucet problem. They are ideal for those who are comfortable with basic DIY plumbing projects and who value quality and performance.
**Key Alternatives:**
* **Aftermarket O-Ring Kits:** These kits are typically less expensive than Delta kits, but may not offer the same quality or performance.
* **Individual O-Rings:** You can purchase individual O-rings from a hardware store, but it can be difficult to find the correct size and material.
**Expert Overall Verdict & Recommendation:**
While aftermarket options exist, we strongly recommend using genuine Delta Faucet O-ring replacement kits for optimal performance and longevity. The slightly higher cost is justified by the superior fit, materials, and ease of installation. For best results, always identify your faucet model number and purchase the corresponding replacement kit.
Q&A: Expert Answers to Common O-Ring Replacement Questions
Here are some frequently asked questions about replacing O-rings in Delta base faucets:
**Q1: How often should I replace the O-rings in my Delta faucet?**
A: The lifespan of O-rings varies depending on water quality and usage. However, it’s generally recommended to replace them every 3-5 years, or sooner if you notice leaks.
**Q2: Can I use any type of lubricant on the O-ring?**
A: No. Only use silicone-based plumber’s grease. Petroleum-based lubricants can damage the rubber and cause the O-ring to fail prematurely.
**Q3: What if I can’t find the exact O-ring kit for my faucet model?**
A: Contact Delta customer support for assistance. They can help you identify the correct O-ring kit or provide alternative solutions.
**Q4: Is it necessary to shut off the water supply before replacing the O-ring?**
A: Yes, it is absolutely essential to shut off the water supply to prevent flooding and water damage.
**Q5: What should I do if the faucet is corroded and I can’t remove the parts?**
A: Try spraying the corroded parts with penetrating oil and let it sit for a few hours. If that doesn’t work, you may need to consult a professional plumber.
**Q6: Can I reuse the old O-ring if it looks okay?**
A: No. Even if the old O-ring appears to be in good condition, it’s best to replace it with a new one. The old O-ring may have lost its elasticity and sealing ability.
**Q7: How do I know if I’ve installed the O-ring correctly?**
A: After reassembling the faucet, turn on the water supply and check for leaks. If you see any leaks, double-check the O-ring installation and tighten the connections further.
**Q8: What if the leak persists even after replacing the O-ring?**
A: The leak may be caused by other issues, such as a damaged faucet body or faulty valve. Consult a professional plumber for further diagnosis and repair.
**Q9: Where can I purchase genuine Delta Faucet O-ring replacement kits?**
A: Genuine Delta Faucet O-ring replacement kits can be purchased at authorized Delta dealers, plumbing supply stores, and home improvement retailers. You can also find them online at the Delta Faucet website and other online retailers.
**Q10: Is it possible to overtighten the faucet connections?**
A: Yes, it is possible to overtighten the faucet connections, which can damage the faucet or the countertop. Tighten the connections securely, but avoid over-tightening.
Conclusion: Mastering O-Ring Replacement in Your Delta Faucet
Replacing the O-ring in your Delta base faucet is a manageable DIY project that can save you money and prevent water damage. By following the steps outlined in this comprehensive guide, you can successfully complete the repair and restore your faucet to its optimal performance. Remember to use genuine Delta replacement parts, take your time, and consult a professional plumber if you encounter any difficulties. We’ve strived to provide a resource far exceeding the depth of standard YouTube tutorials, emphasizing best practices and preventative maintenance. Share your experiences with O-ring replacement in the comments below, or explore our advanced guide to faucet maintenance for more in-depth information.
